Over the past two years I’ve been fortunate enough to shoot five rocket launches for the website www.spaceflightnow.com at both Kennedy Space Center and Vandenburg Airforce Base. It had always been a dream of mine to see a rocket launch, so to be able to actually get behind the scenes of the launches has been incredible. In March of 2016 I even got to go right up to an Atlas V rocket for a shoot with my Everyday Astronaut series.
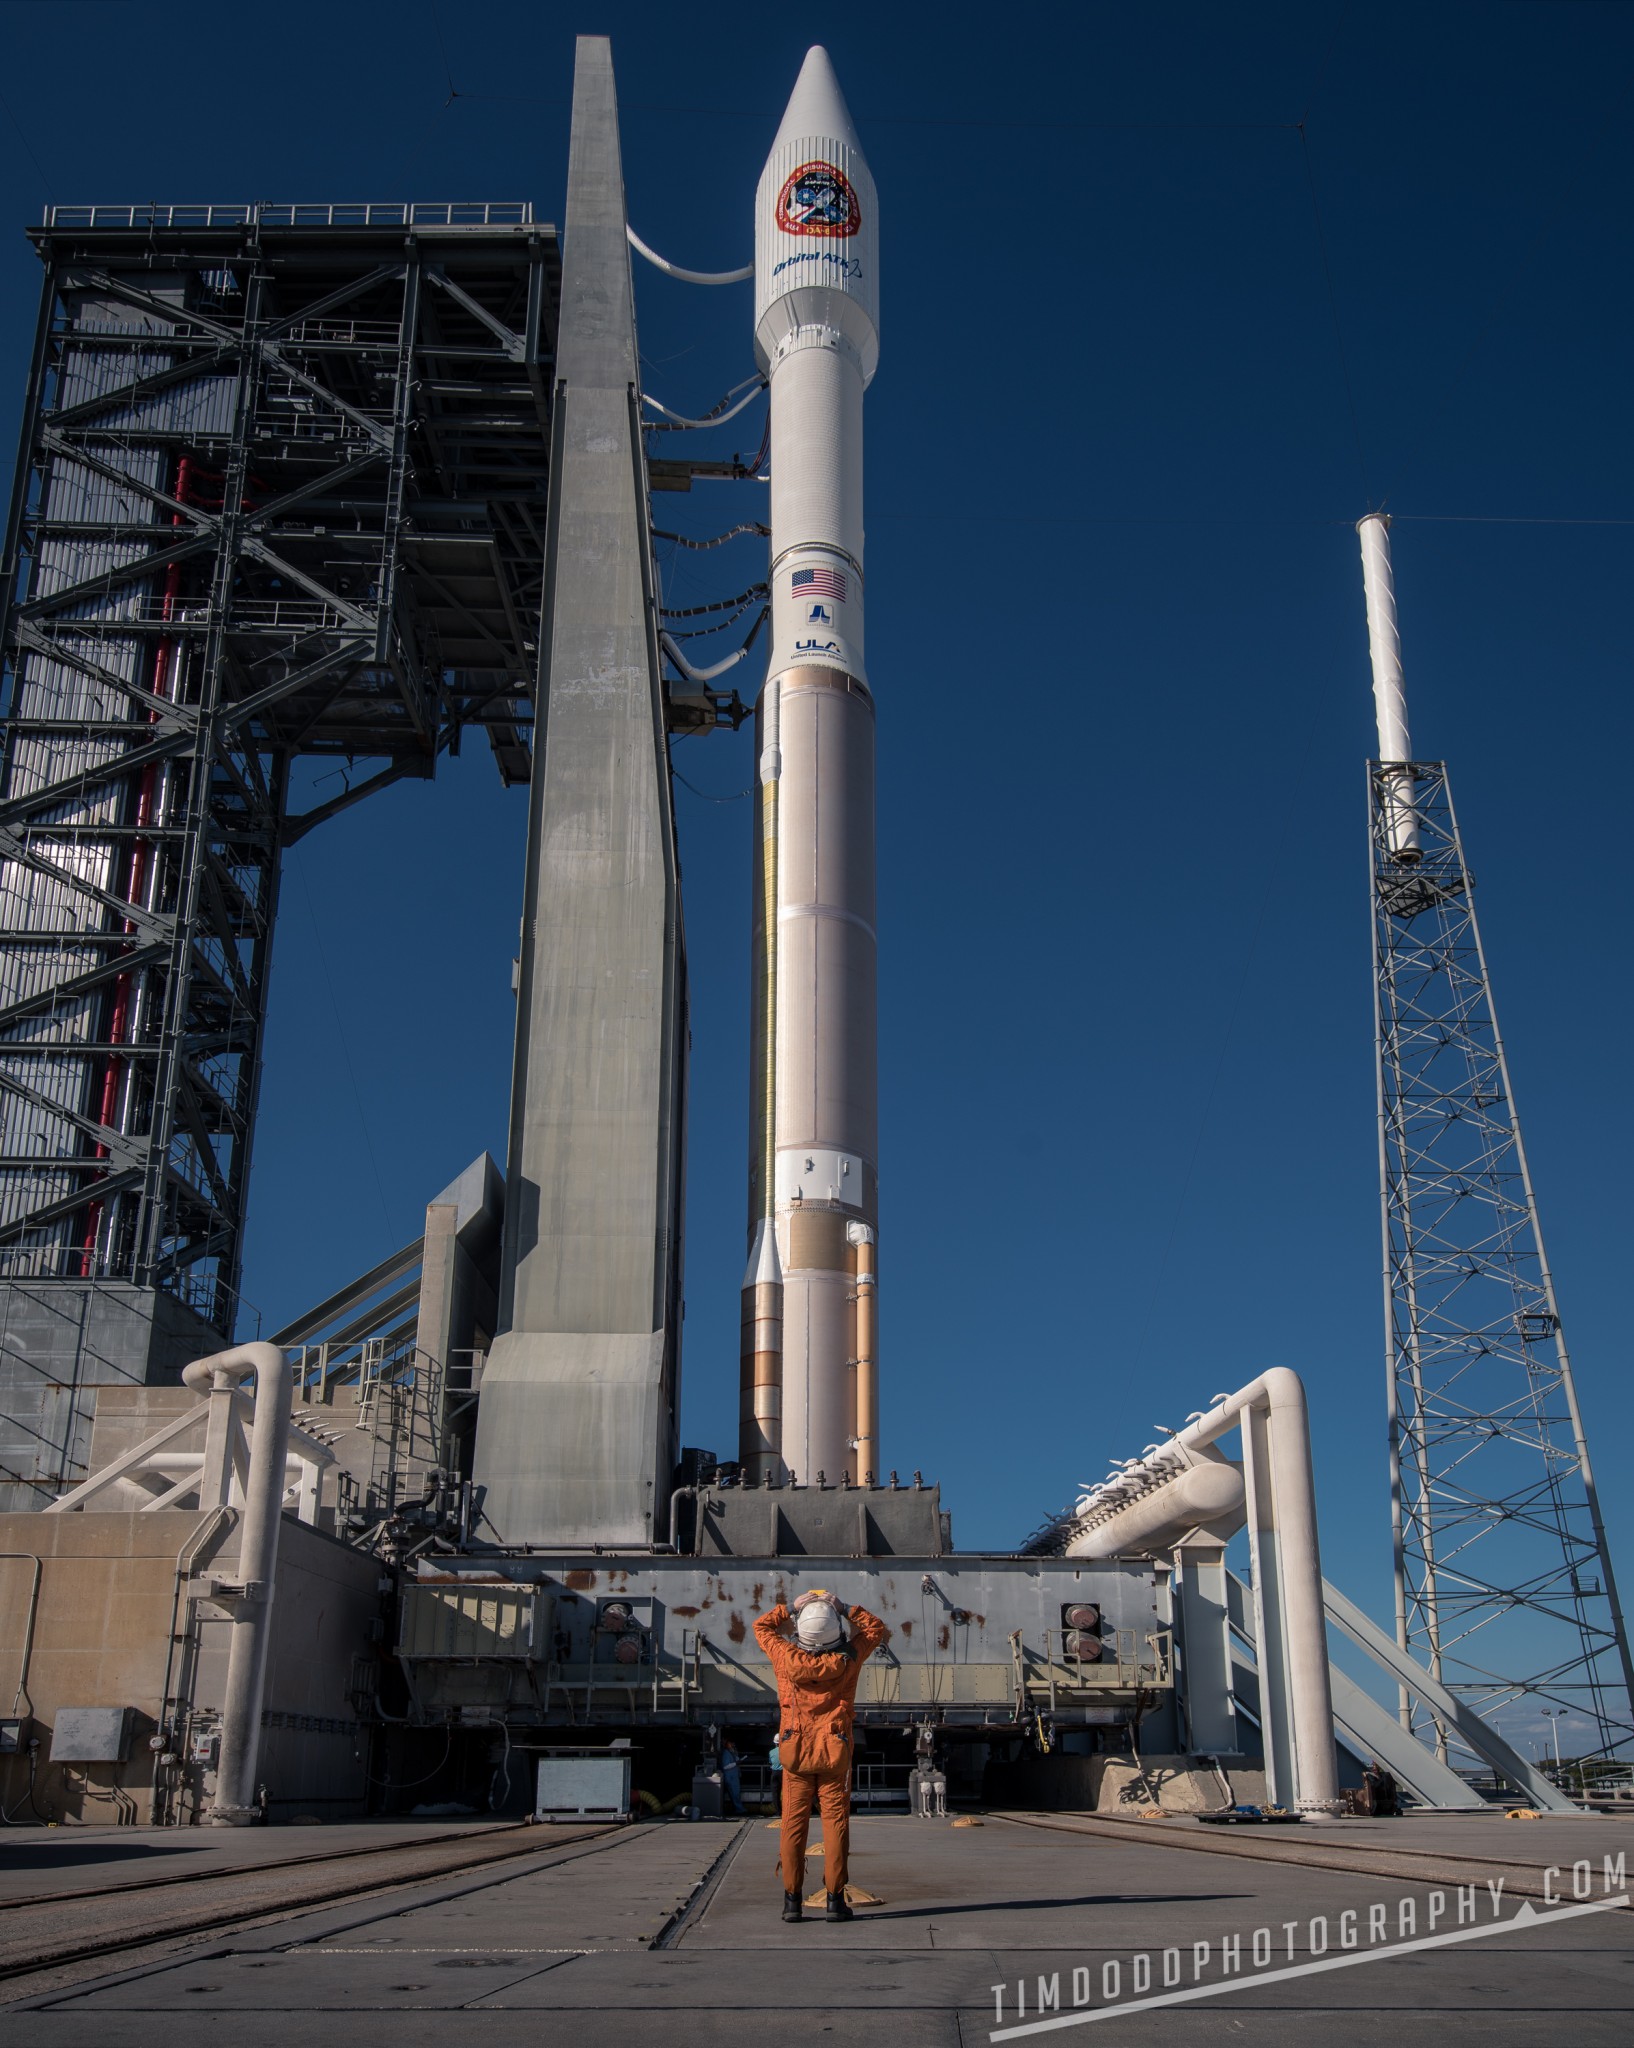
Me in my Everyday Astronaut outfit standing at the base of ULA’s Atlas V rocket carrying Orbital’s Cygnus cargo craft for NASA’s OA-6 mission to the international space station.
Notice how close I am in this picture… less than 100 feet. If I were to stand there when the rocket goes off, I certainly would not be typing this right now. The craziest thing about my tragic death is it wouldn’t be the heat or the blast of the rocket hitting me that would kill me, it’d be the sound waves. Woah.
So how on earth do we set up cameras that close to rockets and have them survive. Well, first off, we don’t. We don’t get to place cameras within a few hundred feet as that’s all the closer the launch providers will let us get. And chances are inside those few hundred feet, the cameras probably wouldn’t survive.
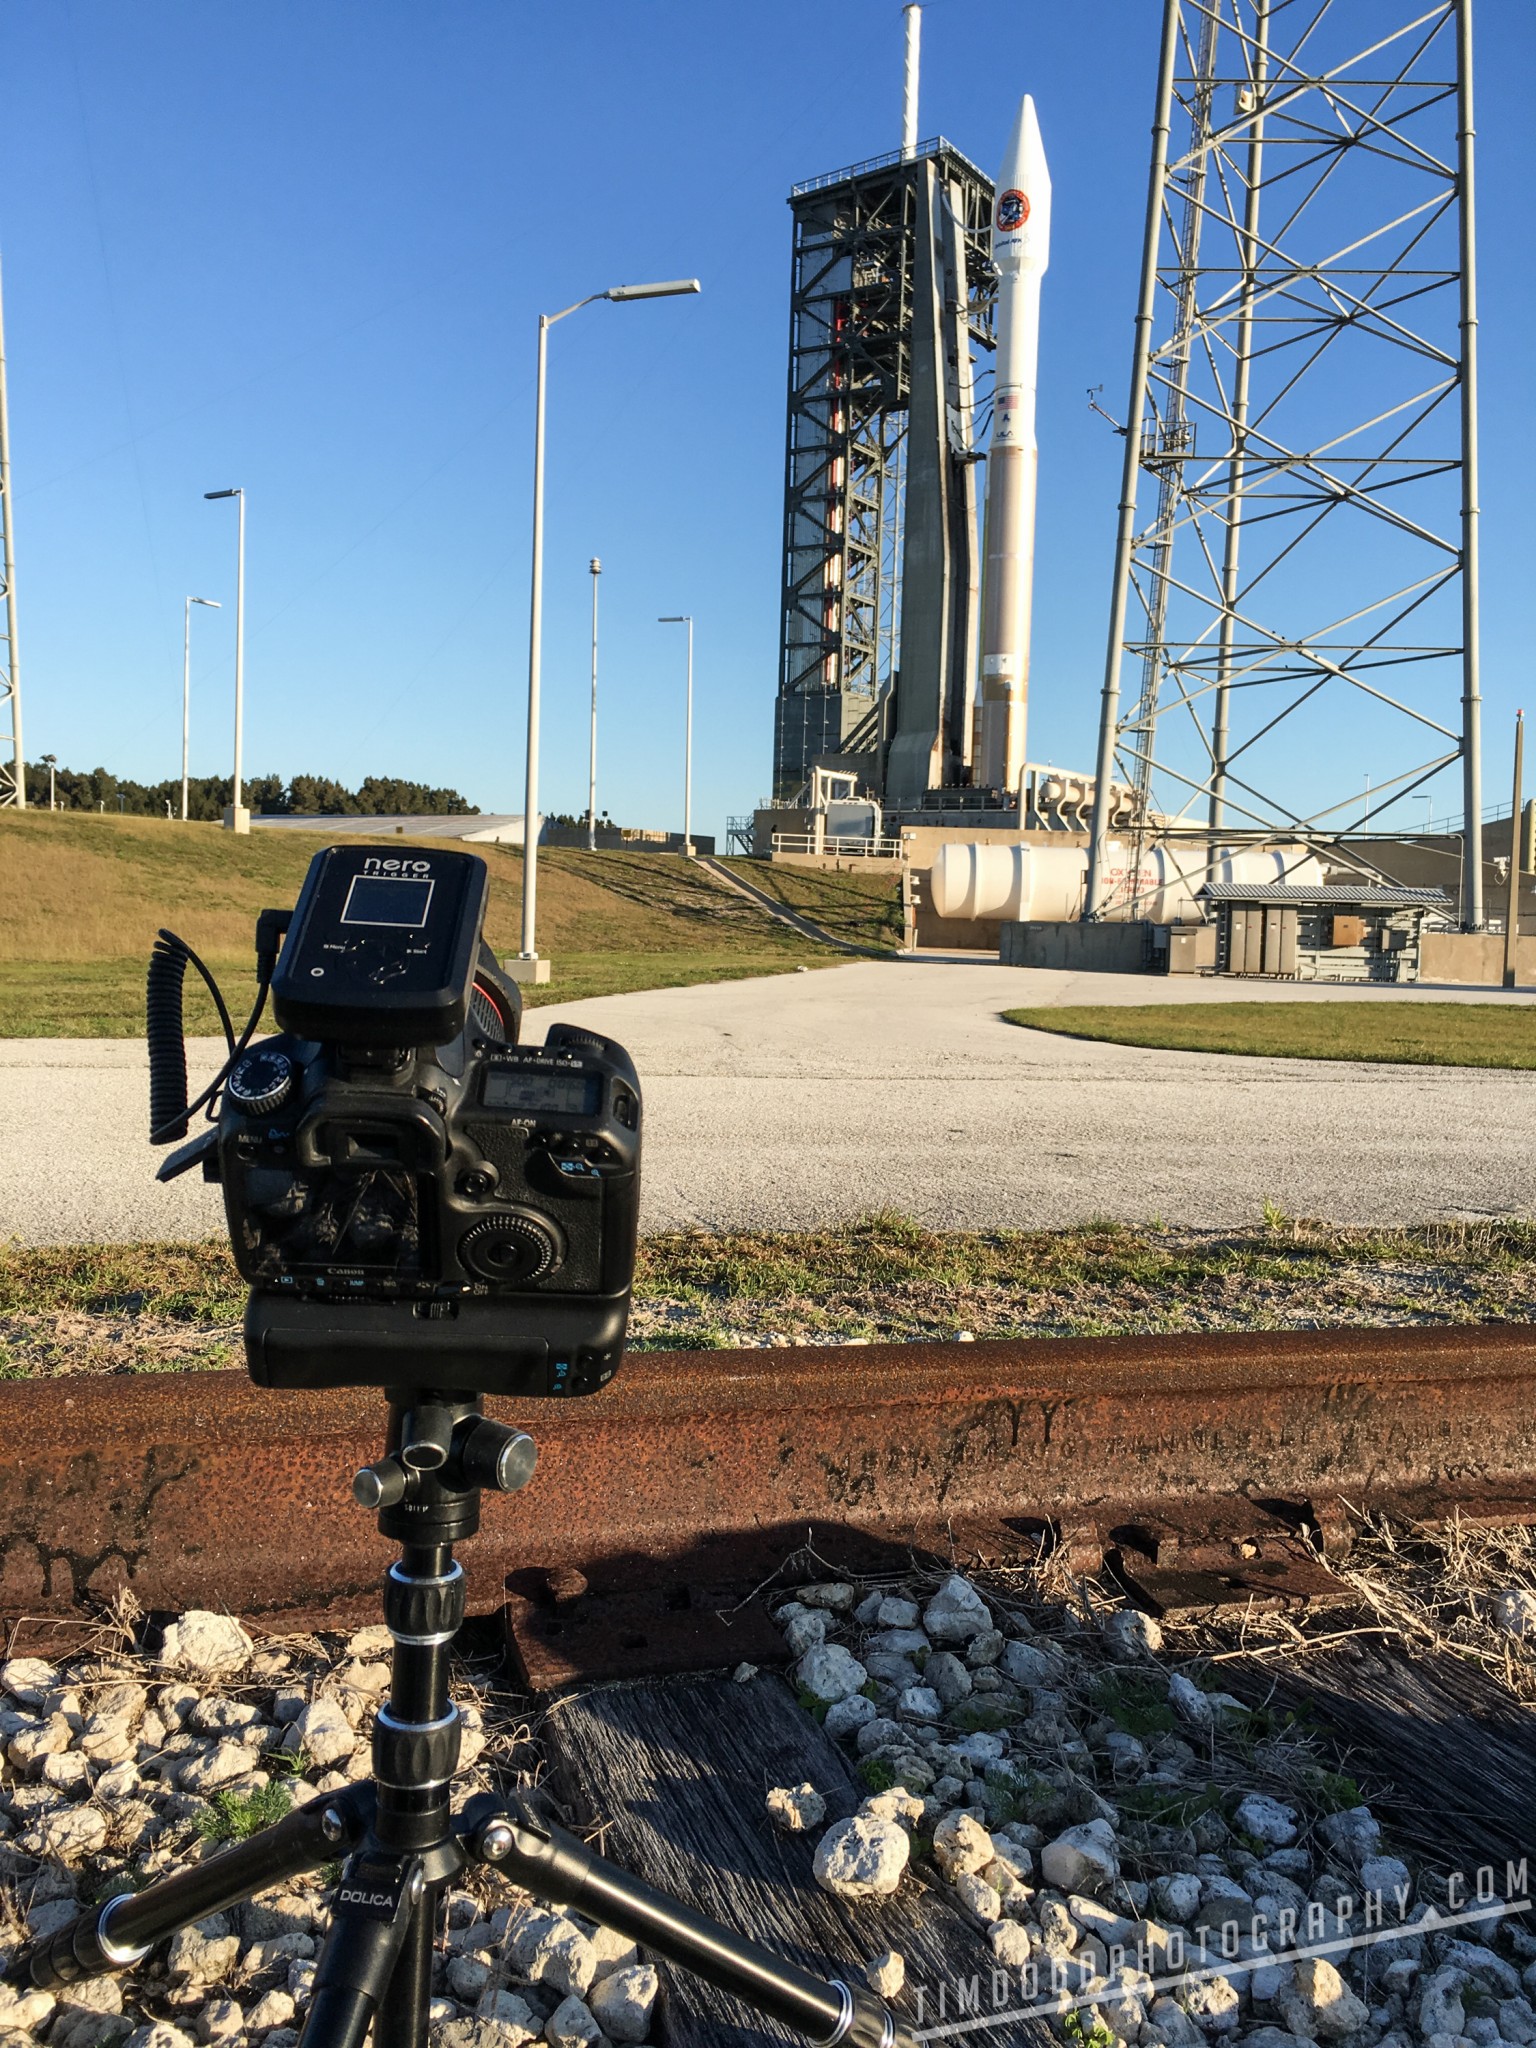
This is a Canon 40D with a MIOPS NERO trigger sitting at a pretty standard distance for remote triggered cameras at about 450 feet away from the Atlas V rocket.
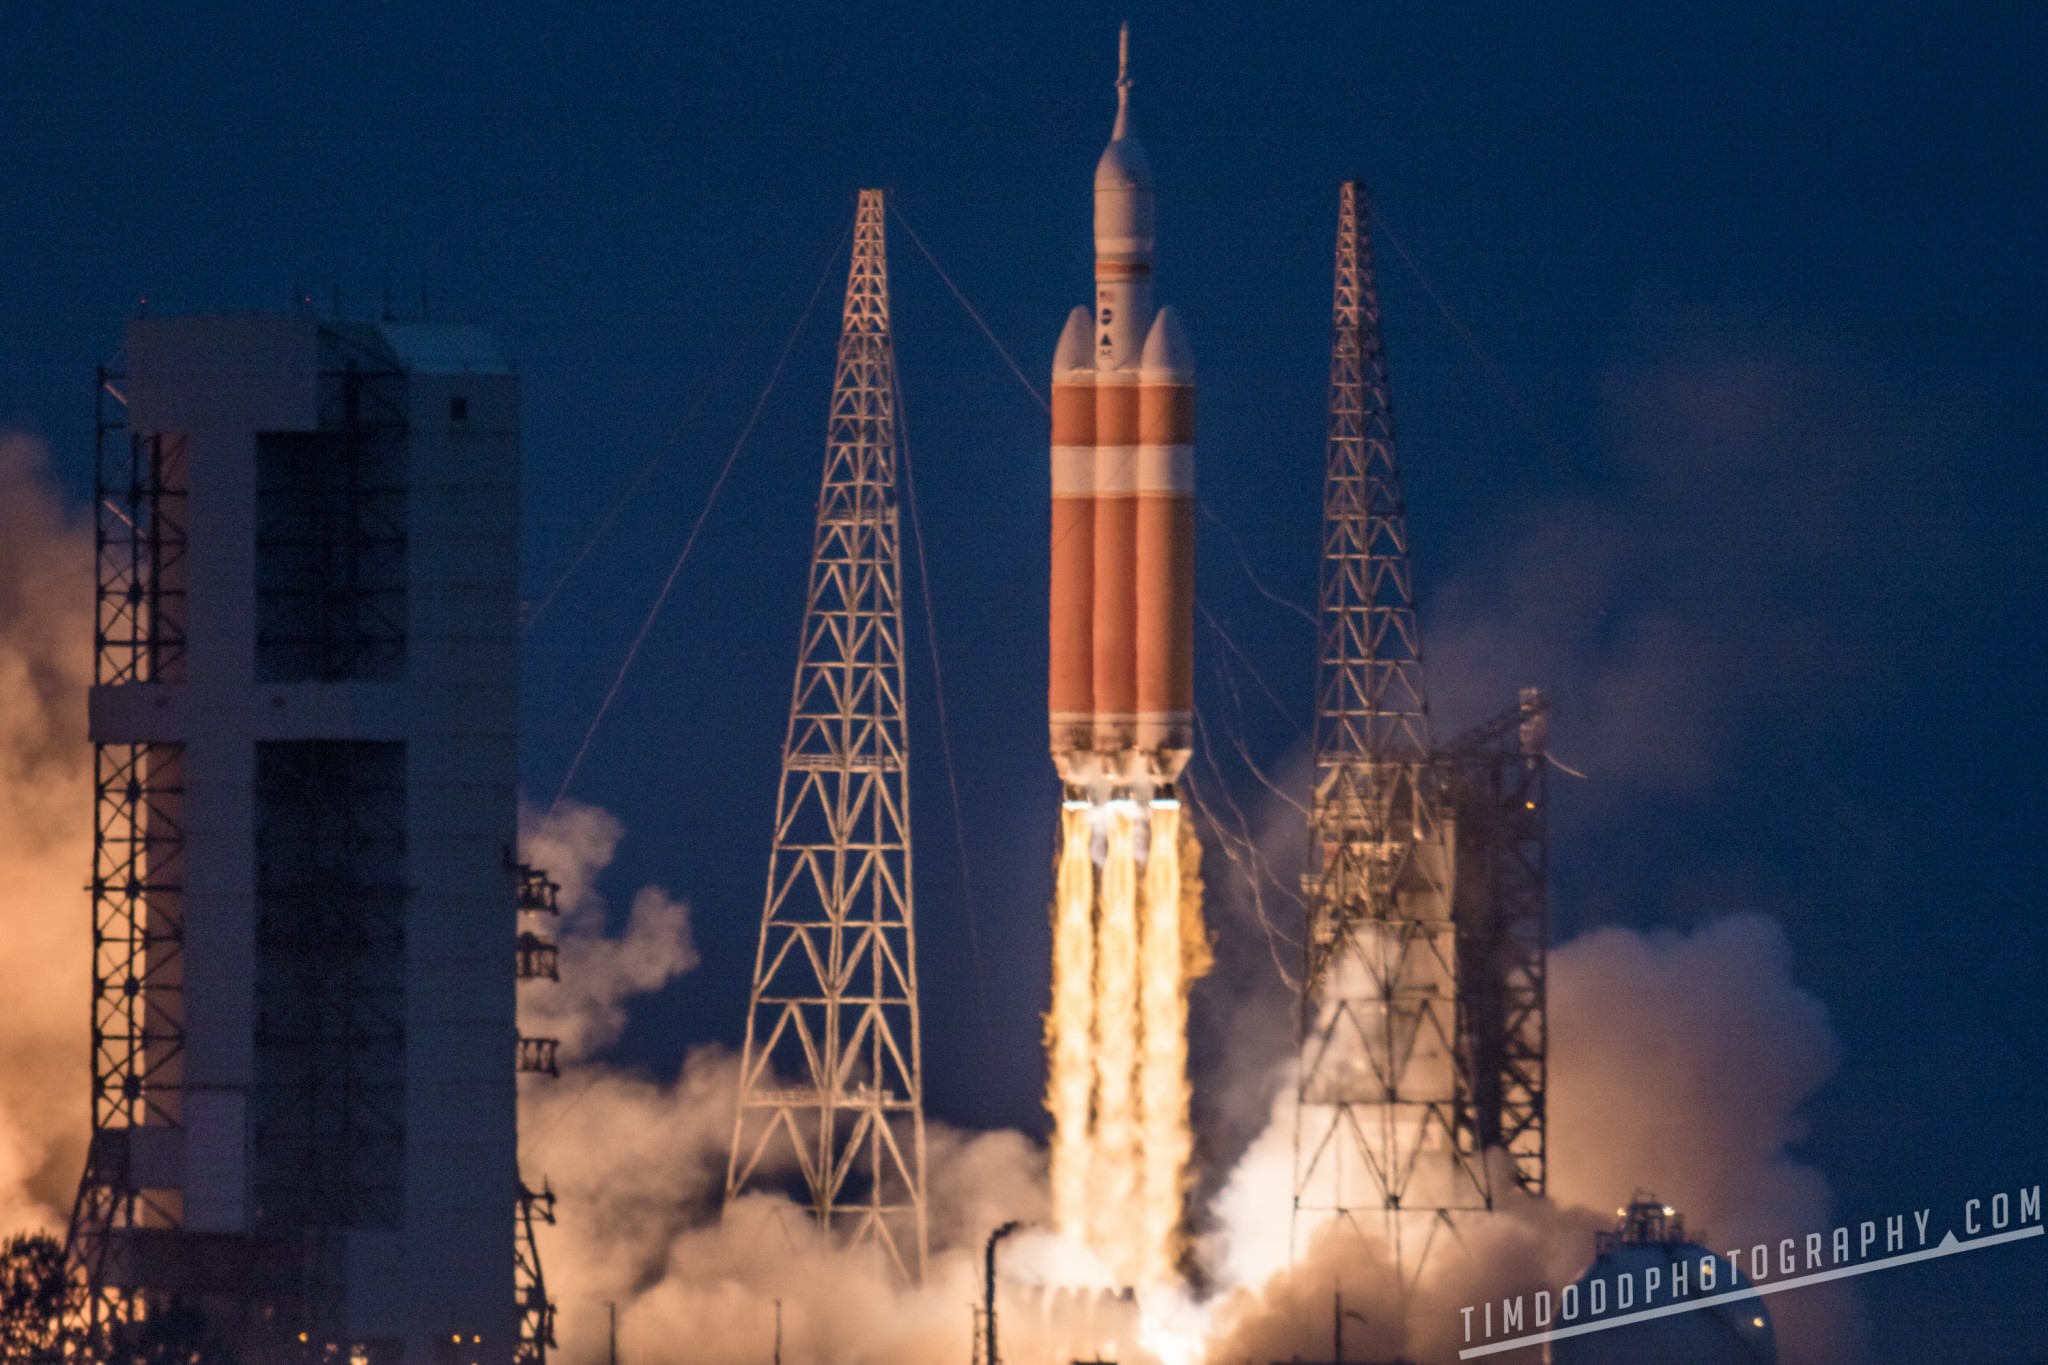
The closest I’ve ever put a camera was for the Orion EFT-1 mission in December of 2014. Orion’s inaugural test flight launched on the biggest rocket currently launching, the United Launch Alliance Delta IV heavy. The rocket is essentially 3 Delta IV first stage rockets strapped together to be able to push bigger payloads into orbit.
Of course I had the “No risk it, no biscuit” attitude so I put my most expensive remote triggered set up there… a Canon 5D MKIII with a Canon 17mm – 40mm F4L lens. EEK!
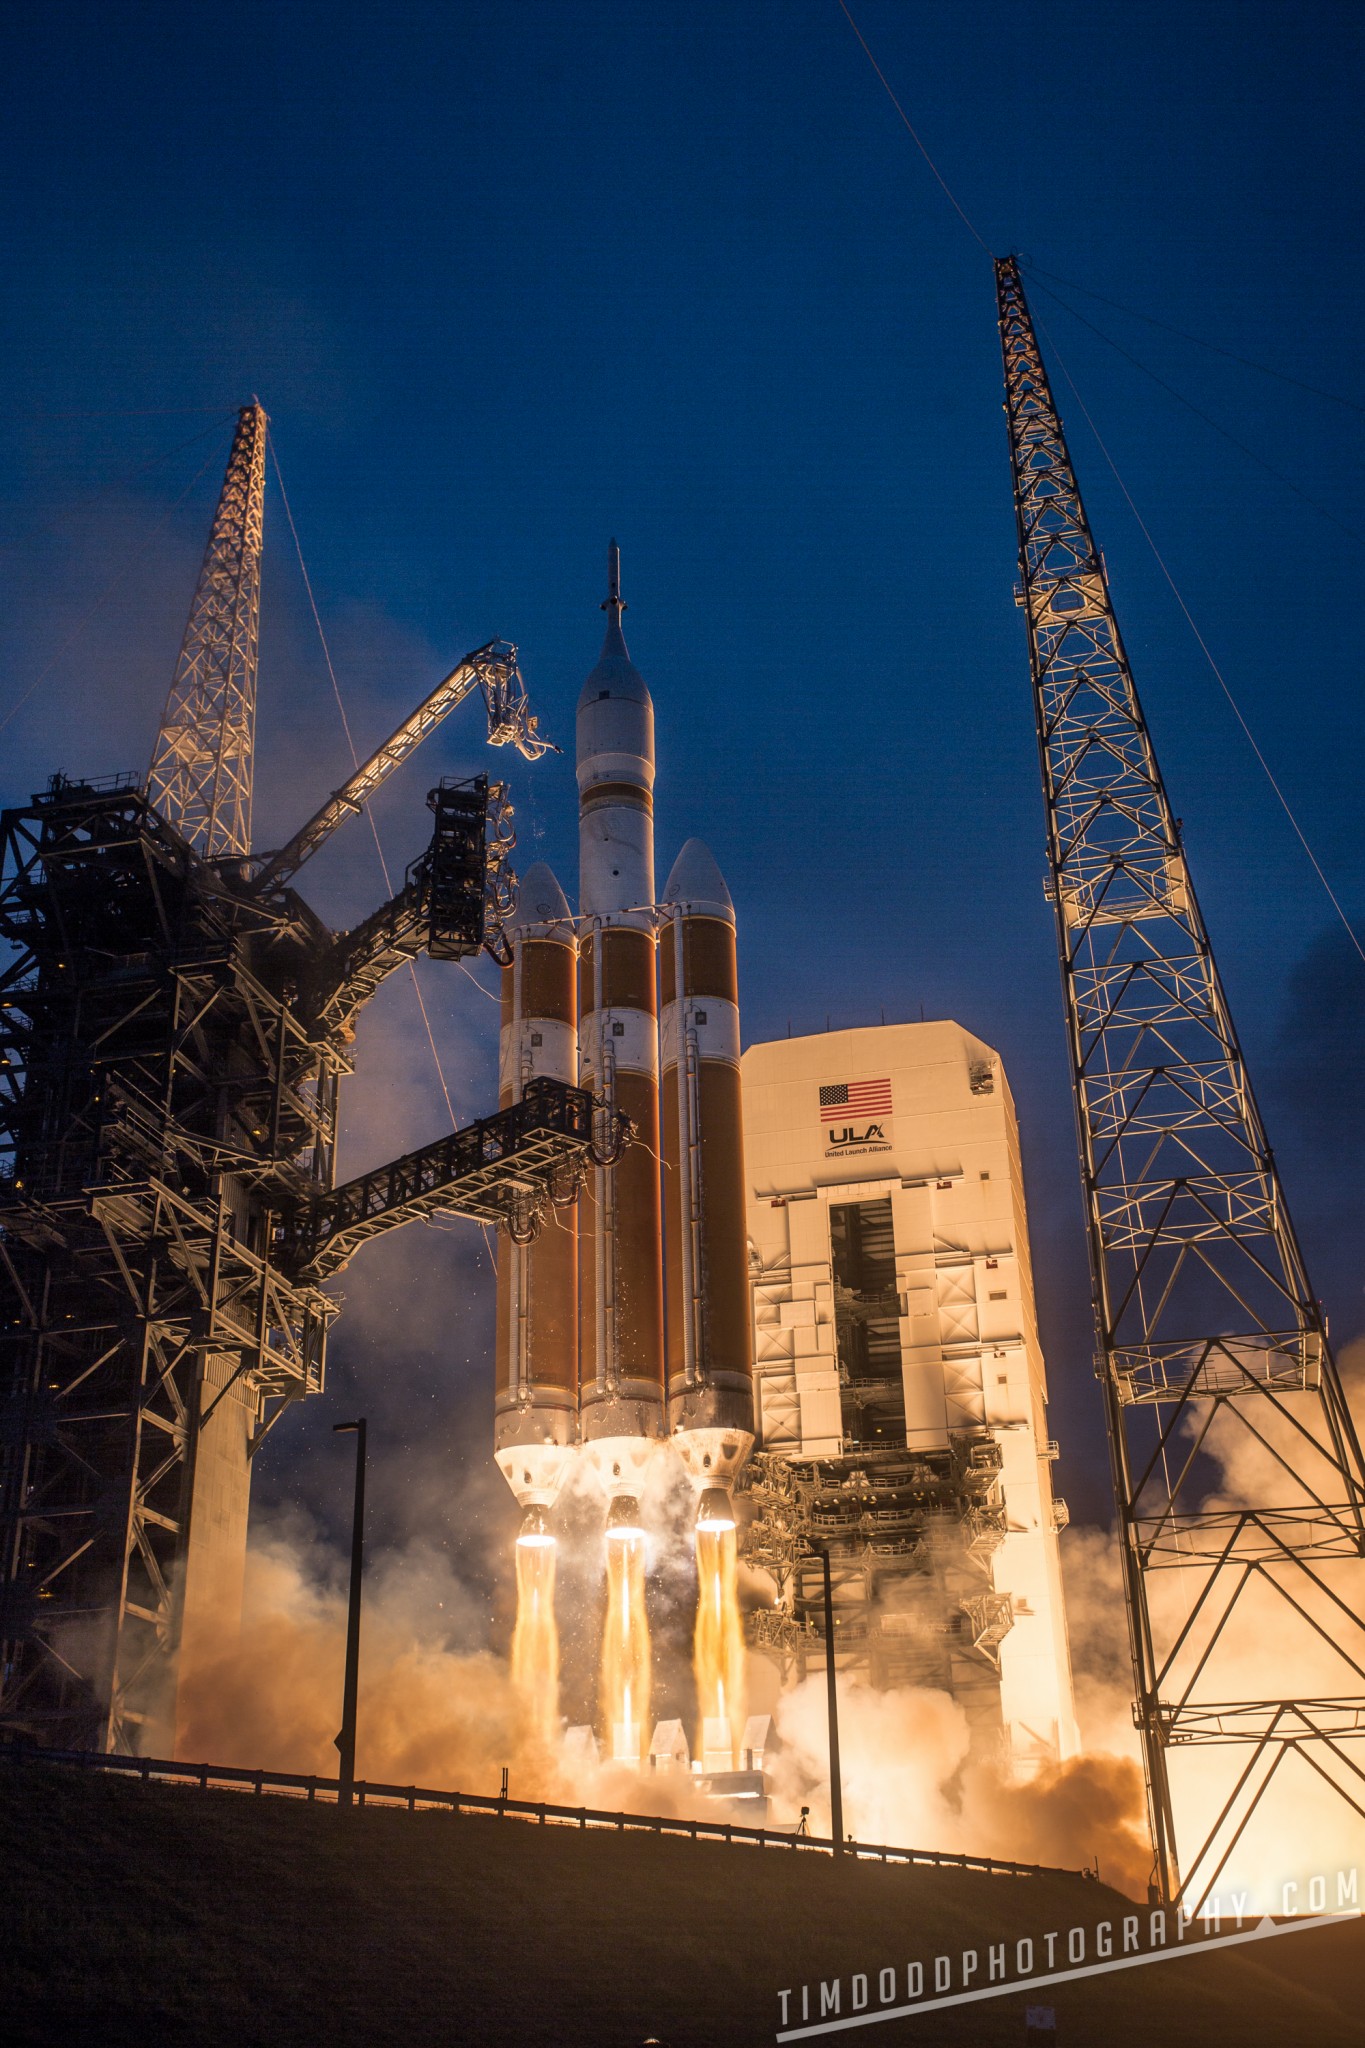
NASA’s Orion test flight EFT-1 launched on a Delta IV Heavy in December, 2014 from Cape Canaveral Air Force Station Space Launch Complex 37.
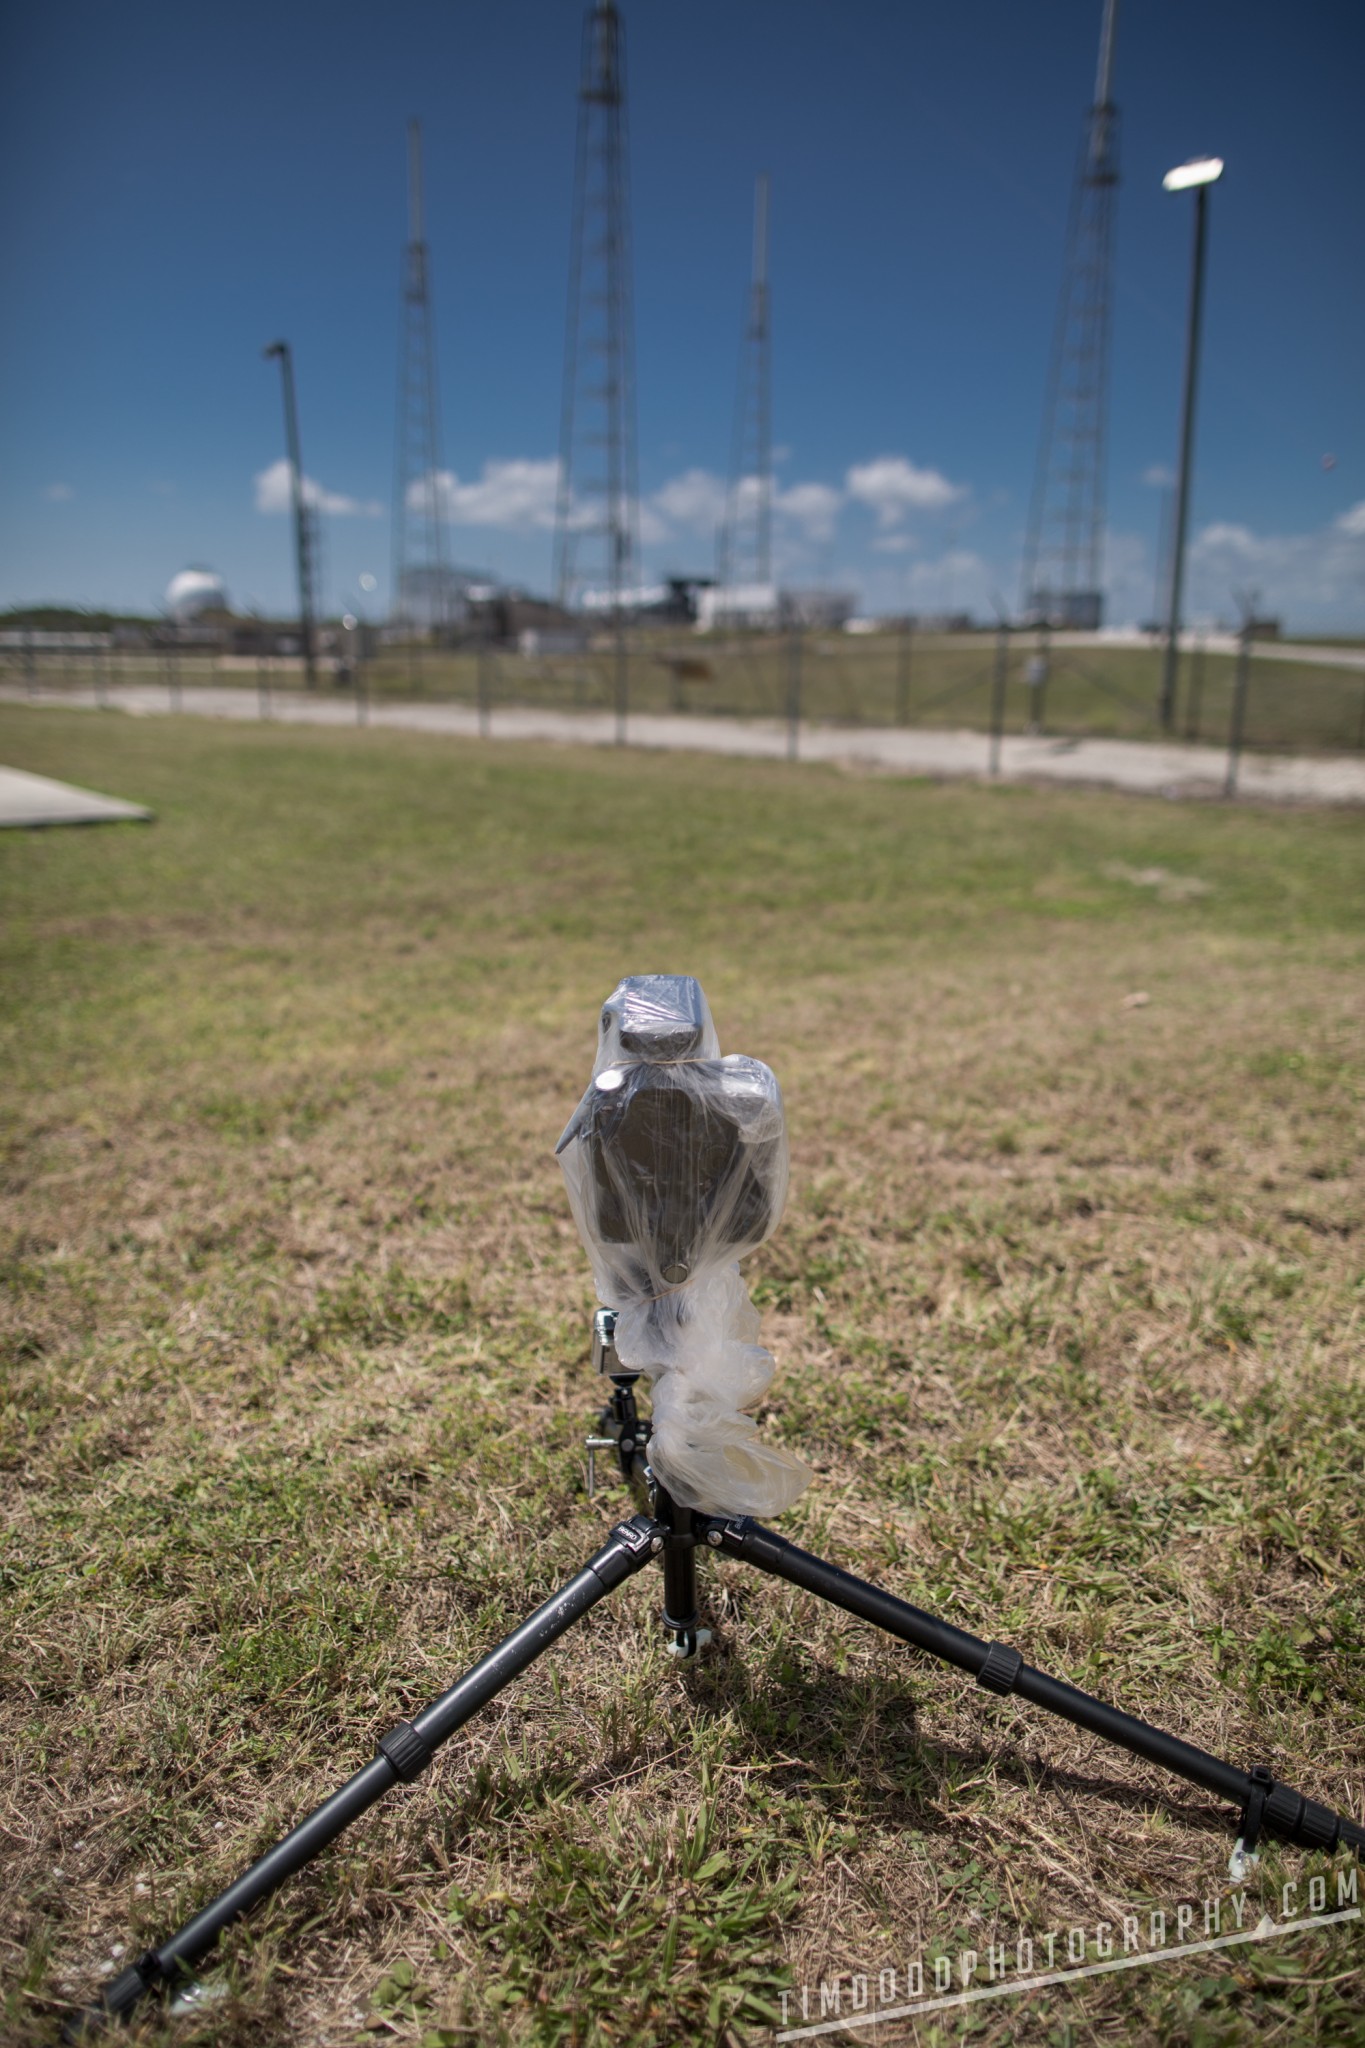
According to google maps, this picture was about 250 feet away from the rocket. I was lucky though. Cameras right next to me were knocked over, tripods broken or even worse, some cameras were simply missing. A bit of it could be luck, but I also think a good job with staking down the tripod goes a long way.
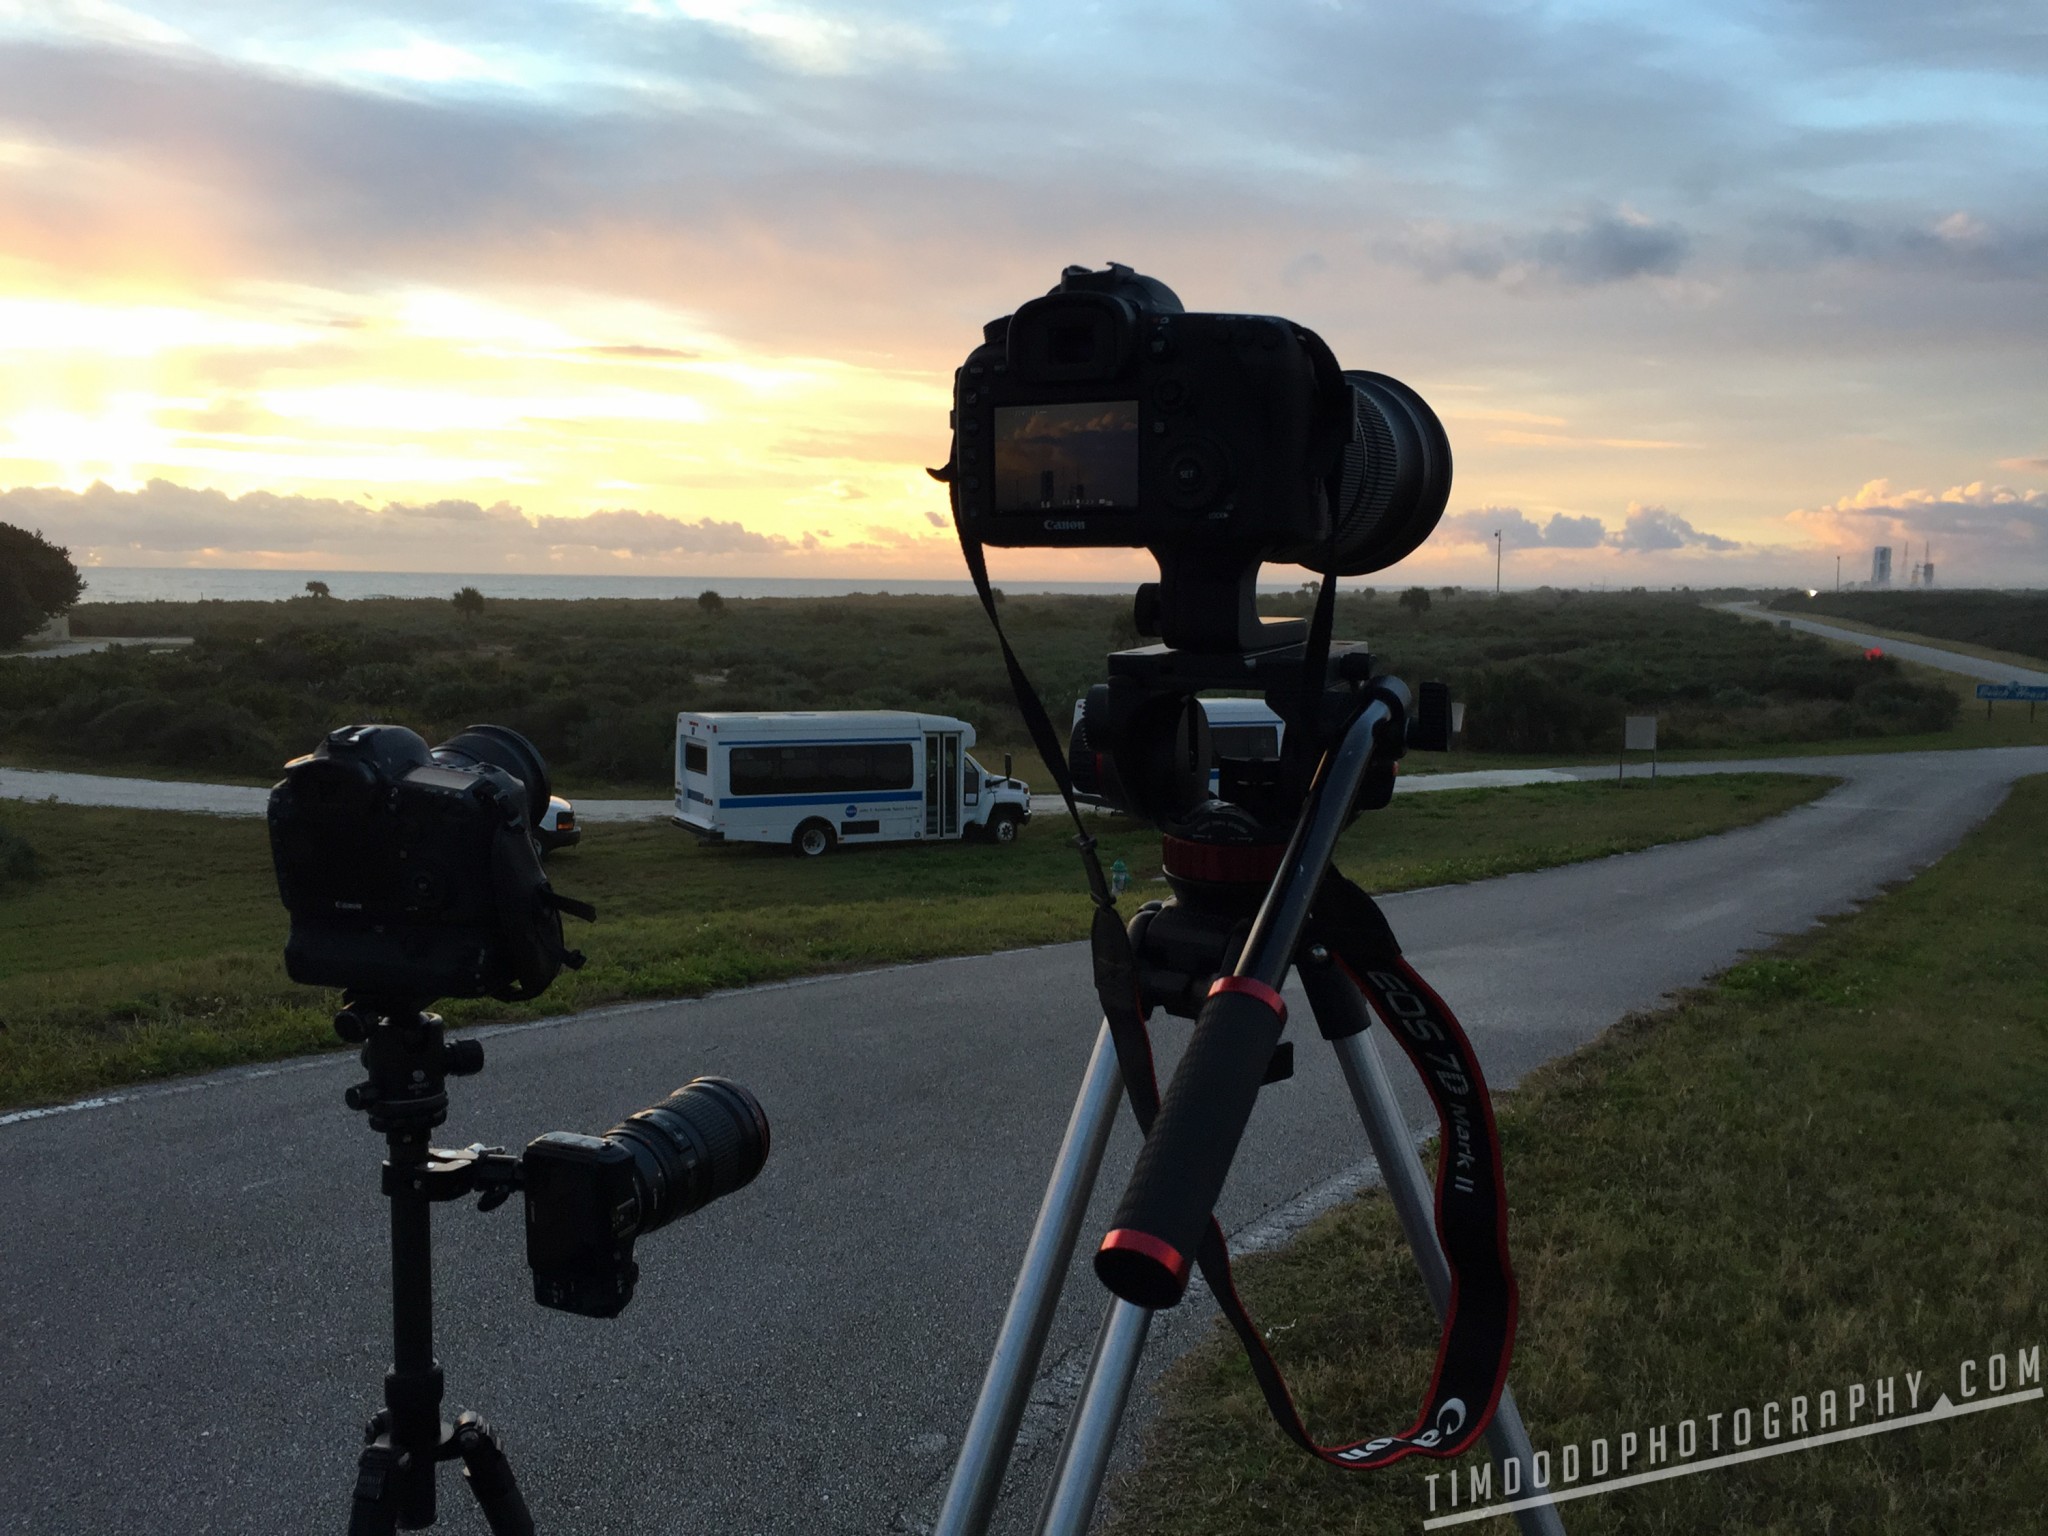
A remote camera at SpaceX’s Space Complex 40 for a Falcon 9 launch.
Notice the low and wide stance of my tripod. That’s my key. I like to keep the center of gravity extremely low and the base as wide as possible.
Now you might ask, “What’s with the garbage bag?” Well, that’s a rocket proof garbage bag! Just kidding. I opt to not try to protect from the blast of the rocket (since most of the blast comes straight at the lens and the lens needs a clear line of site). Some people put the cameras in mail boxes or other systems to try and keep their cameras safer. To me, they’re only creating more surface area to be caught by the blast. The main concern really is weather more than the blast. The cameras need to sit idle for 24 hours or more out in the elements. This means if it rains, or there’s lots of dew at night (which there will be), your camera could get soaked. This is why there’s a bag there. Simple.
So how does the camera start taking pictures?
Great question. Notice on top of the camera in each of those pictures is a little box with a cable running from it? Well that’s a sound trigger! Since people need to be at least 3 miles away from launching rockets, we need to have something that can trigger the camera on its own. Remember that whole “People-can’t-stand-near-rockets-because-the-sound-alone-will-kill-them” thing, well, that’s the one variable you can count on in any launch, NOISE. And that being true of any launch, what a reliable asset to have “pull the trigger” on a camera!
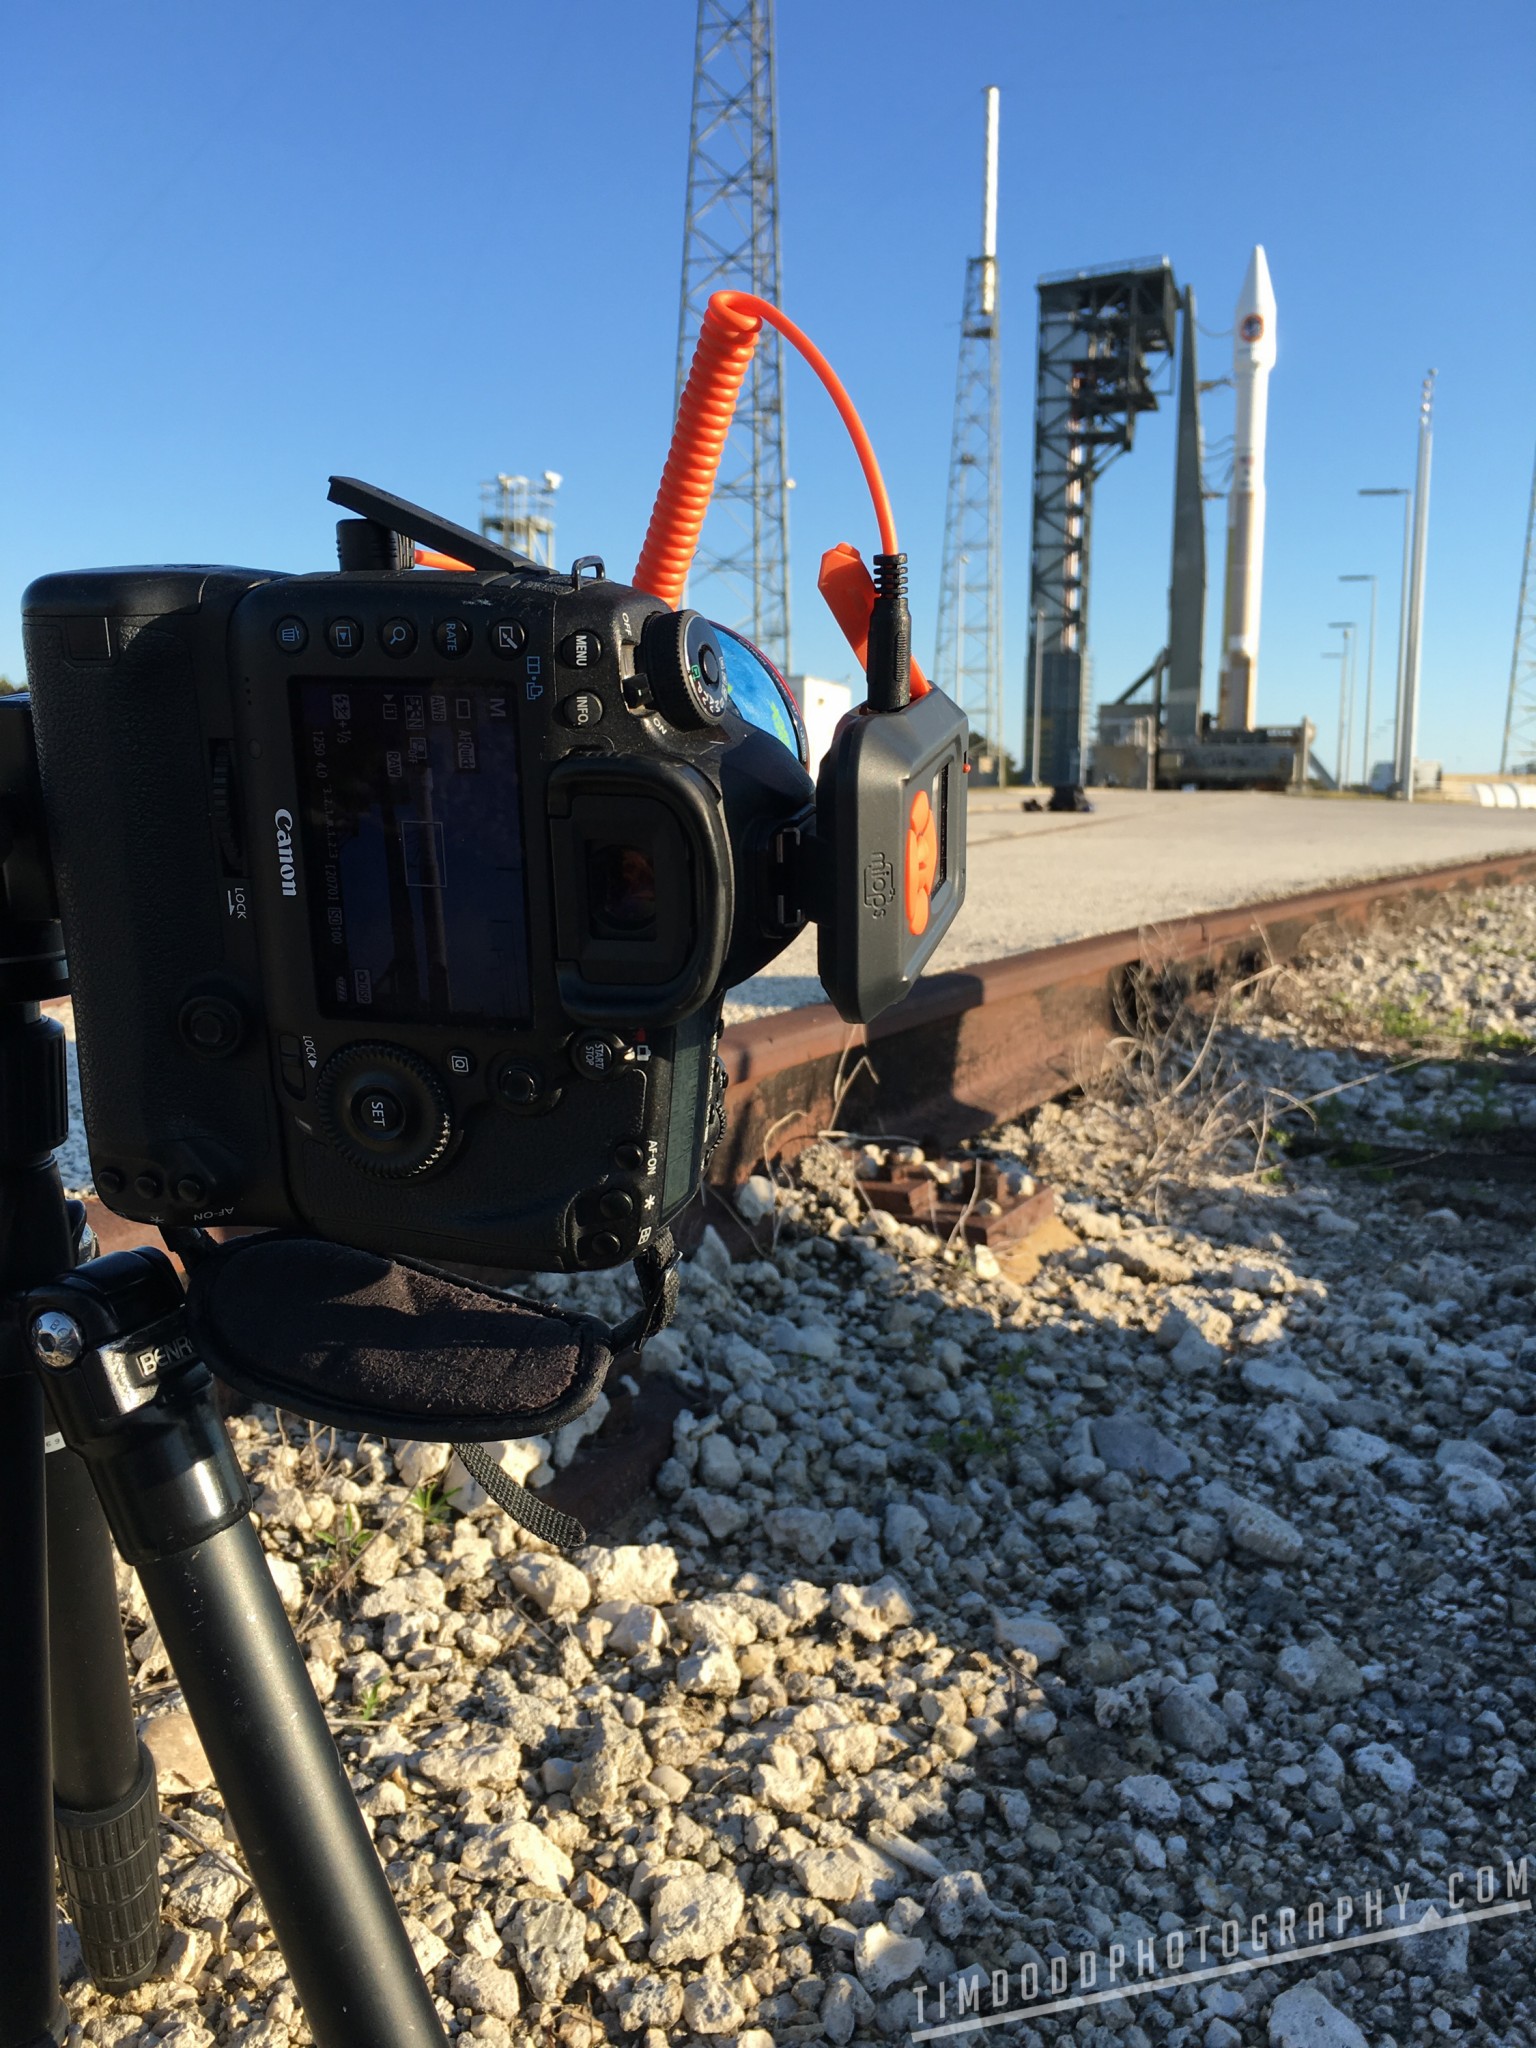
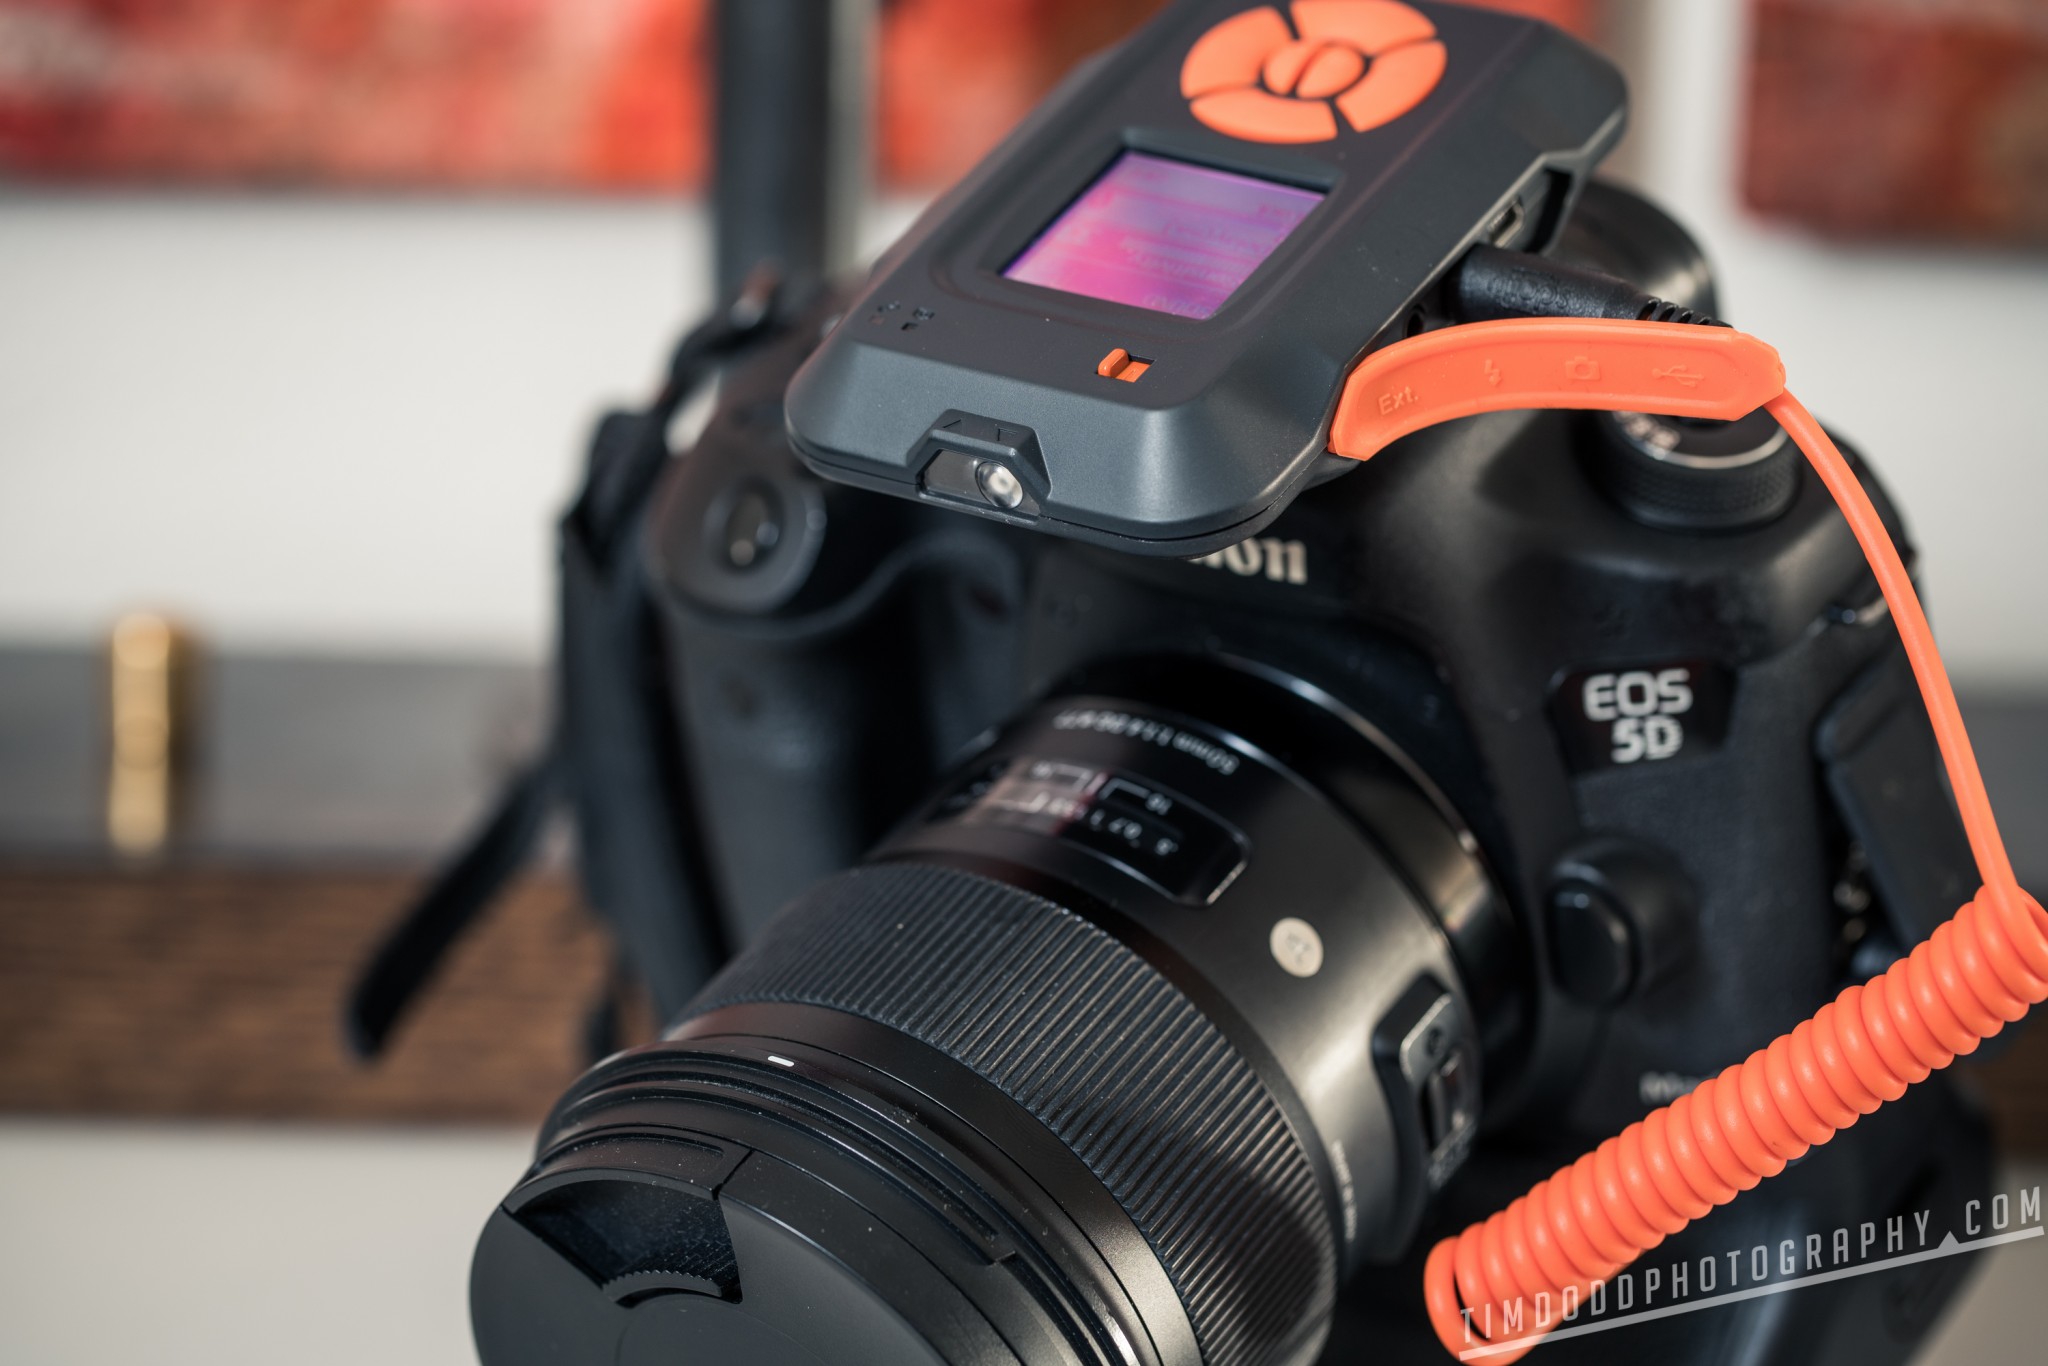
A MIOPS smart camera trigger on a Canon 5D MKIII with a Canon 135mm F2.0L lens at Cape Canaveral Air Force Station Launch Complex 40. The rocket is a United Launch Alliance Atlas V carrying an Orbital ATK Cygnus capsule for NASA’s OA-6 International Space Station resupply mission.
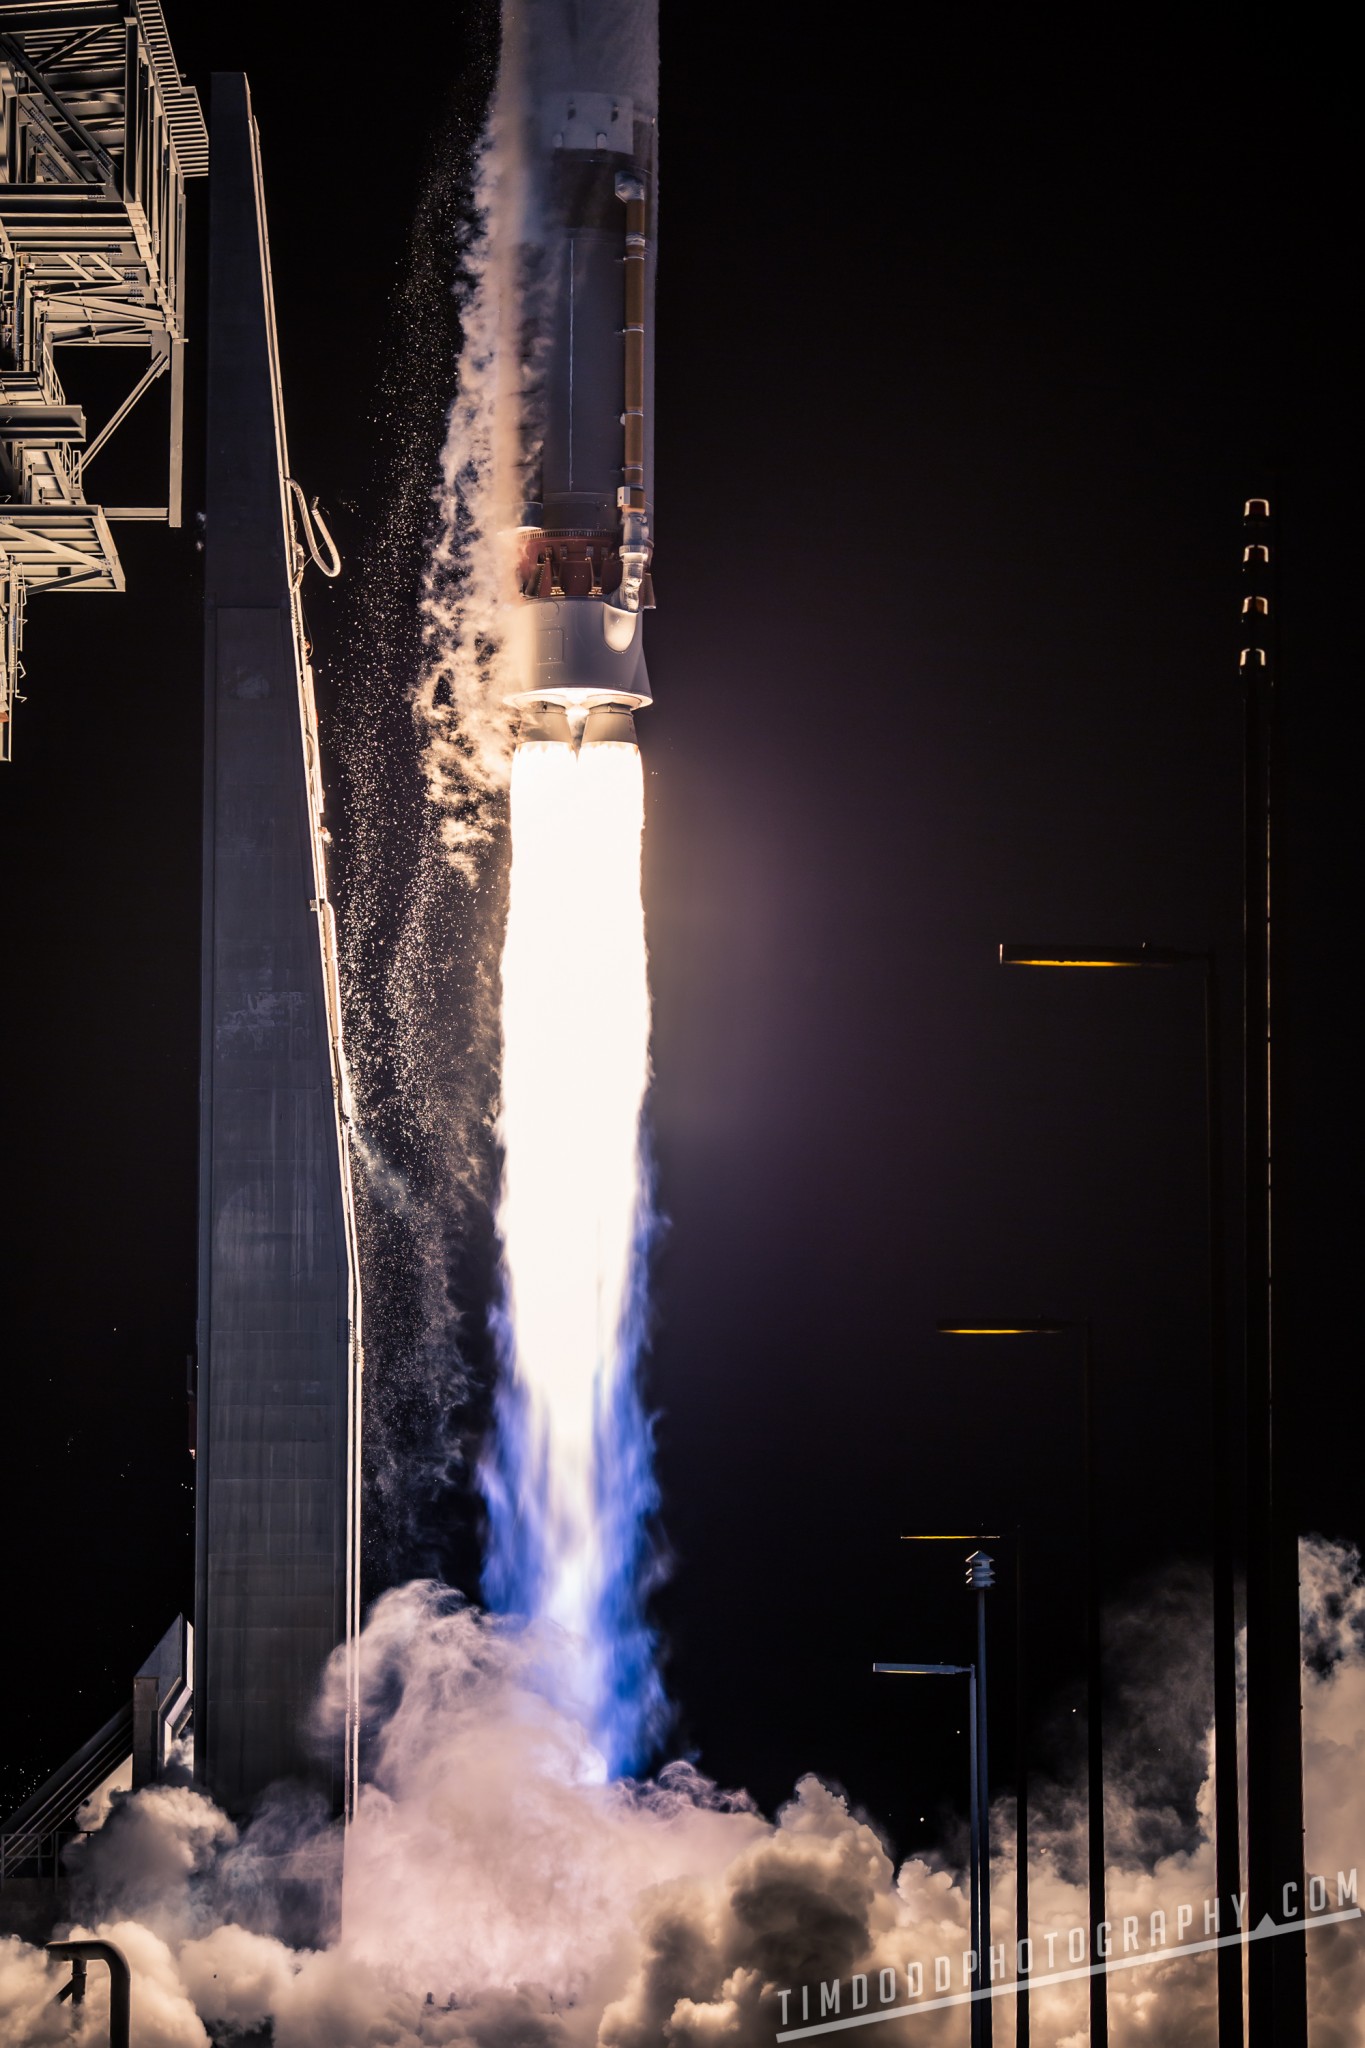
Here’s the result of that Canon 5D MK III and Canon 135mm F2.0L lens triggered by the MIOPS camera trigger.
Here’s my step by step set up:
- Turn on the camera (DUH)
- Turn on the sound trigger (DUH)
- Shoot in manual mode on the camera (see below for exposure settings per rocket)
- Make sure the camera is in continuous burst mode
- Shoot in RAW! This will allow you to make much more drastic exposure corrections when editing pictures
- Set the lens to manual focus and achieve a nice clean focus
- Speaking of lenses, do not use any filters! They can cause a nasty glare against the bright rocket
- Put gaffers or painters tape on the lens on both the zoom and focus ring and zoom ring to ensure they don’t move
- Have the trigger set to a very high threshold for sound. This means make it so even talking and clapping won’t set it off. I make it so I can only trigger it by tapping it very hard. That way we don’t get any accidental triggers by birds or trucks or people talking
- Stake the tripod into the ground (ideally one per leg)
- Place the rocket-proof bag (ha) over the camera and tripod
- If the camera will go off in the middle of the night or early morning consider putting 18 hour hand warmers around the lens to prevent condensation from ruining your images
Rockets are all different shapes and sizes and put out different amounts of light. My good friend, Walter Scriptunas II (check out his launch photo guide as well) has put together a basic guideline for exposure settings for various rockets.
This is my take on triggered exposures:
Rocket: Atlas V 401 (No boosters) Delta IV & Atlas V (with boosters) Falcon 9 v1.1
Shutter Speed: 1/800 1/1000 1/1000
Aperture: F5.6 F8 F8
ISO: 200 200 100
Do note that for the most part these settings will be the same for night or day since we’re trying to expose our image to the rocket and rockets put out the same amount of light day or night.
I find these settings to be a very good estimate. I prefer to shoot with a lower ISO, so I typically will swap out a lower F-stop in favor of an ISO 100 and/or a faster shutter speed compared to other photographers. This does require risking using nicer lenses, but it’s worth it.
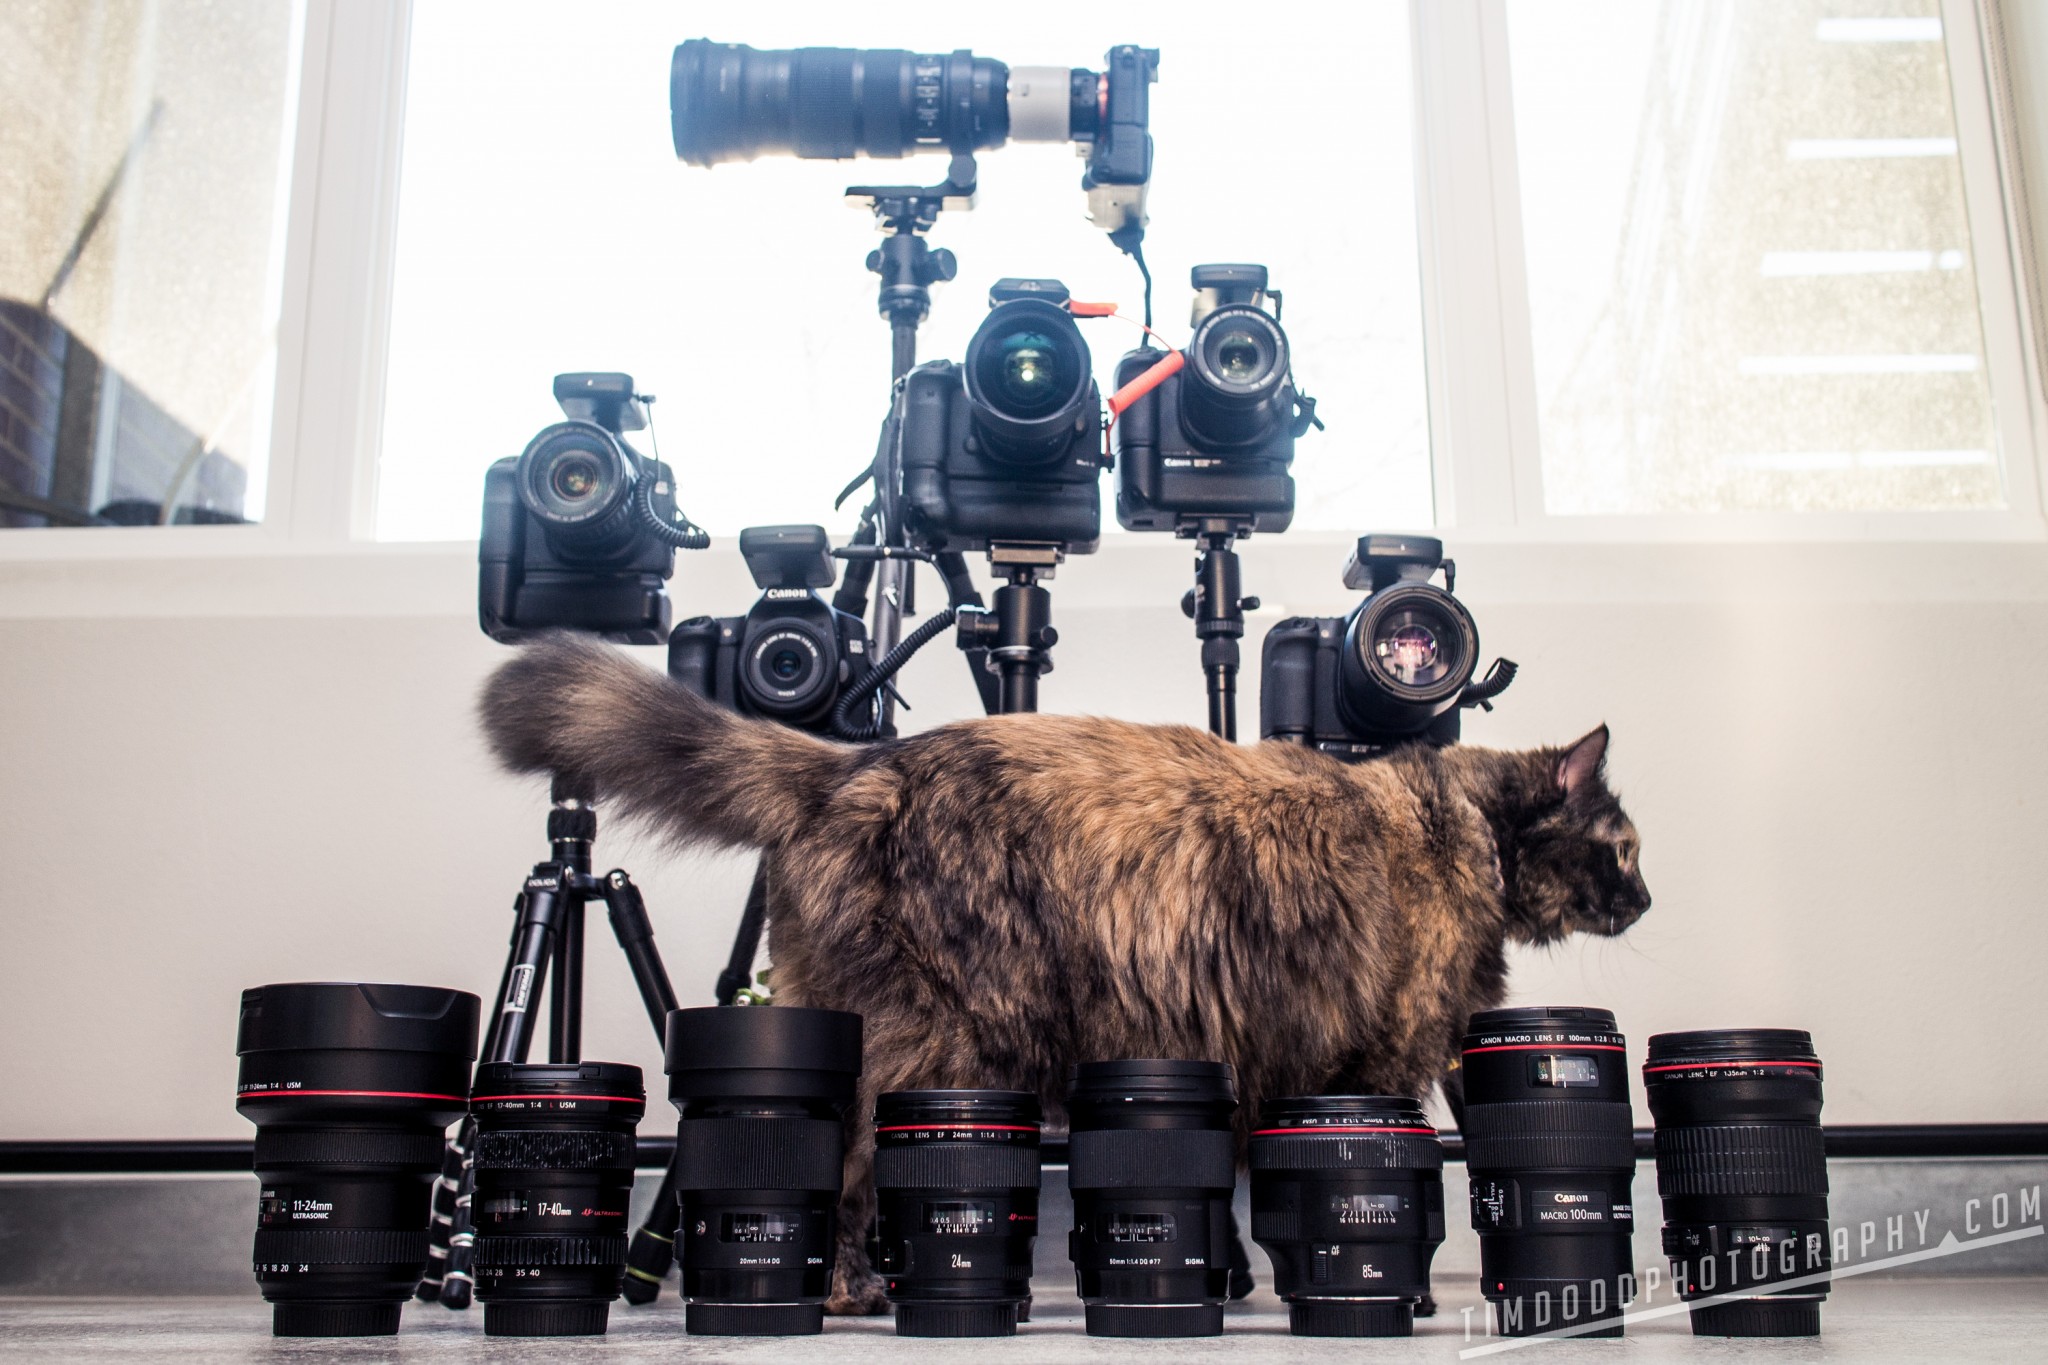
So my collection of gear may be a little absurd, but hey, it works. When I shoot launches I put out five remote cameras. 3 Canon 40D’s, 1 Canon 50D and a Canon 5D MKIII. They’re all triggered by either NERO or MIOPS triggers.
So, remember those sound triggers? Why do I use NERO? There’s plenty of options out there like trigger trap, Vela Pop or making your own homemade versions, so why NERO? Well, to be honest, my first launch I didn’t have much time to get a trigger. NERO was the only thing I could get my hands on quickly. Since then, I’ve learned it’s quirks and I’ve learned to trust it. To date, out of 18 triggered cameras in 5 launches, I’ve only had one problem. And it really was user error on my end… So that being said, they have a perfect record. So I keep using them!
After a few launches, my biggest gripe about the triggers was a built in delay/buffer that they programmed into the triggers. This would normally be a good thing, the idea being if you’re trying to shoot something relatively quiet, the sound of the camera shooting would keep it shooting in a continual loop. So a delay between shots would prevent that. But for rocket launches we want that baby to keep firing as quickly as the camera can go. I reached out to the makers of NERO, Miops, to see if they could remove the delay buffer that prevents the trigger from continually shooting. They sent me a unit with the buffer removed and it was amazing. Then I went to order another one and they sent me their newest version, the MIOPS smart NT.

My first MIOPS NT smart trigger. The new and improved version of the NERO trigger.
So what changed between the NERO and the MIOPS smart NT? Well for starters one of my biggest concerns with the NERO has been addressed. The relatively short battery life. The NERO runs off 2 AAA batteries which last just over 24 hours. That’s decent, but if there’s more than one scrub you’re screwed. The MIOPS smart NT has a rechargeable (YAY) Lithium Ion battery that lasts well beyond 48 hours, making me sweat a lot less if there is a scrub.
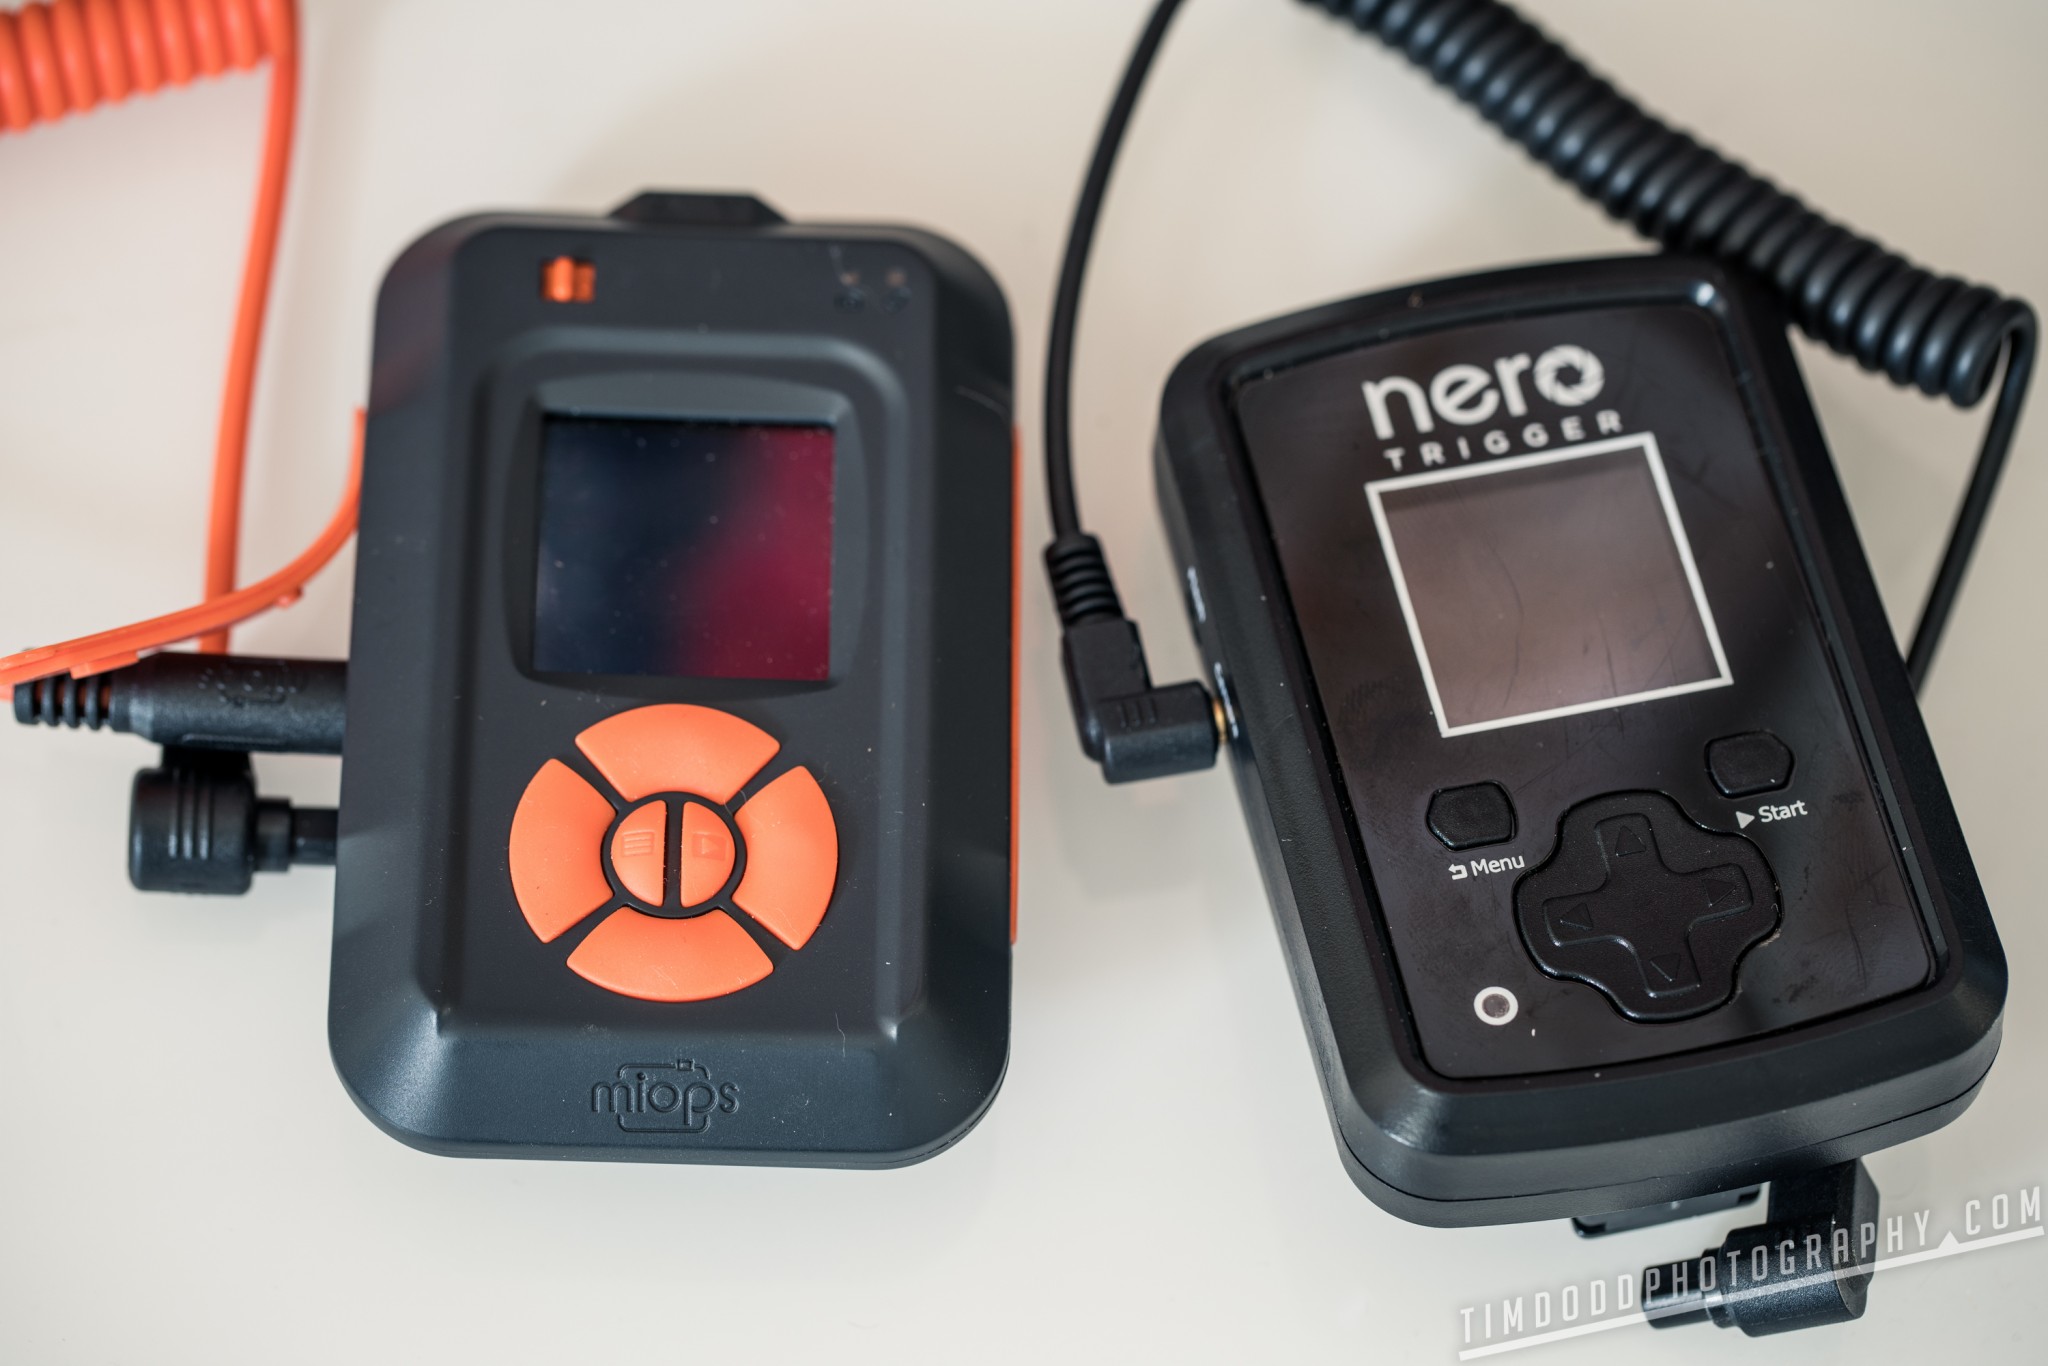
New and old. I certainly prefer the new look of the MIOPS smart NT and the build quality went up a notch or two as well when compared to the old NERO trigger.
The new trigger can be controlled by your smartphone via bluetooth which at first I thought was a total gimmick. After the install and launch of the MIOPS app, I found it to be very convenient. This is mostly true if you get your remote set up finished and camera all sealed up in a bag and you realize you need to make an adjustment. This actually happened my first time using the trigger. I got it all set up and realized I had the threshold way too low and it was going off just by people around me clapping. I fired up the app and changed it, no problem!
MIOPS sitting on a top of a Canon 5D MK III with a Sigma 50mm F1.4 Art
But my previous gripe (and I told MIOPS this) is that it still has the delay buffer. Well, mine didn’t because they removed it for me, but they promised me they’re working on a version that has the option to turn off the delay. This might even be fixable on units sold via user updatable firmware (a big improvement over the NERO).
Besides bluetooth, updatable firmware, and a rechargeable battery, the unit also has a nicer color screen and is shipped in a much nicer package.
So until something else comes out that I trust more than MIOPS, I’ll keep shooting with them. They’re reliable, small, simple and most importantly readily available. I got most of my NERO’s very quickly via Amazon (click link).
So what if I don’t have press credentials and will be taking pictures of a rocket from miles away?
So, you’re on vacation in Orlando and want to catch a rocket launch at Kennedy Space Center. You’ve somehow made it through my massively long write up and landed here at this portion of my post. Or maybe you’re with the press for a NASA social but don’t have a remote camera and still want to take good pictures of the launch from the press site or VAB. Well this portion is for you!
So I don’t want to spend time telling you where to view a launch. If you’re with the press, you’ll obviously be closer than most people and if you’re in the general public, most people go to Jetty Park or they line Cocoa Beach. If you’re lucky, you might be able to reserve tickets at Exploration Tower for a better view or buy tickets for a launch via Kennedy Space Center for their closer views.
So what kinds of things are we looking for when taking pictures of a rocket from far away? Well the first thing that will help will be a nice long telephoto lens. The higher the millimeter (mm’s) the better. I personally use a Sigma 120mm – 300mm F2.8 Sports with a Canon 2X teleconverter on it. That gets me to 600mm @F5.6 which is a nice long lens and a nice low F-stop.
My long distance set up. A Canon 7D MKII with a Sigma 120-300mm F2.8 Sports and Canon 2x tele, A Canon 5D MKIII with a Sigma 50mm F1.4 Art, and a Canon EOS M with a Canon 135mm F2.0L
So what kind of shots can you expect from each of these set ups?
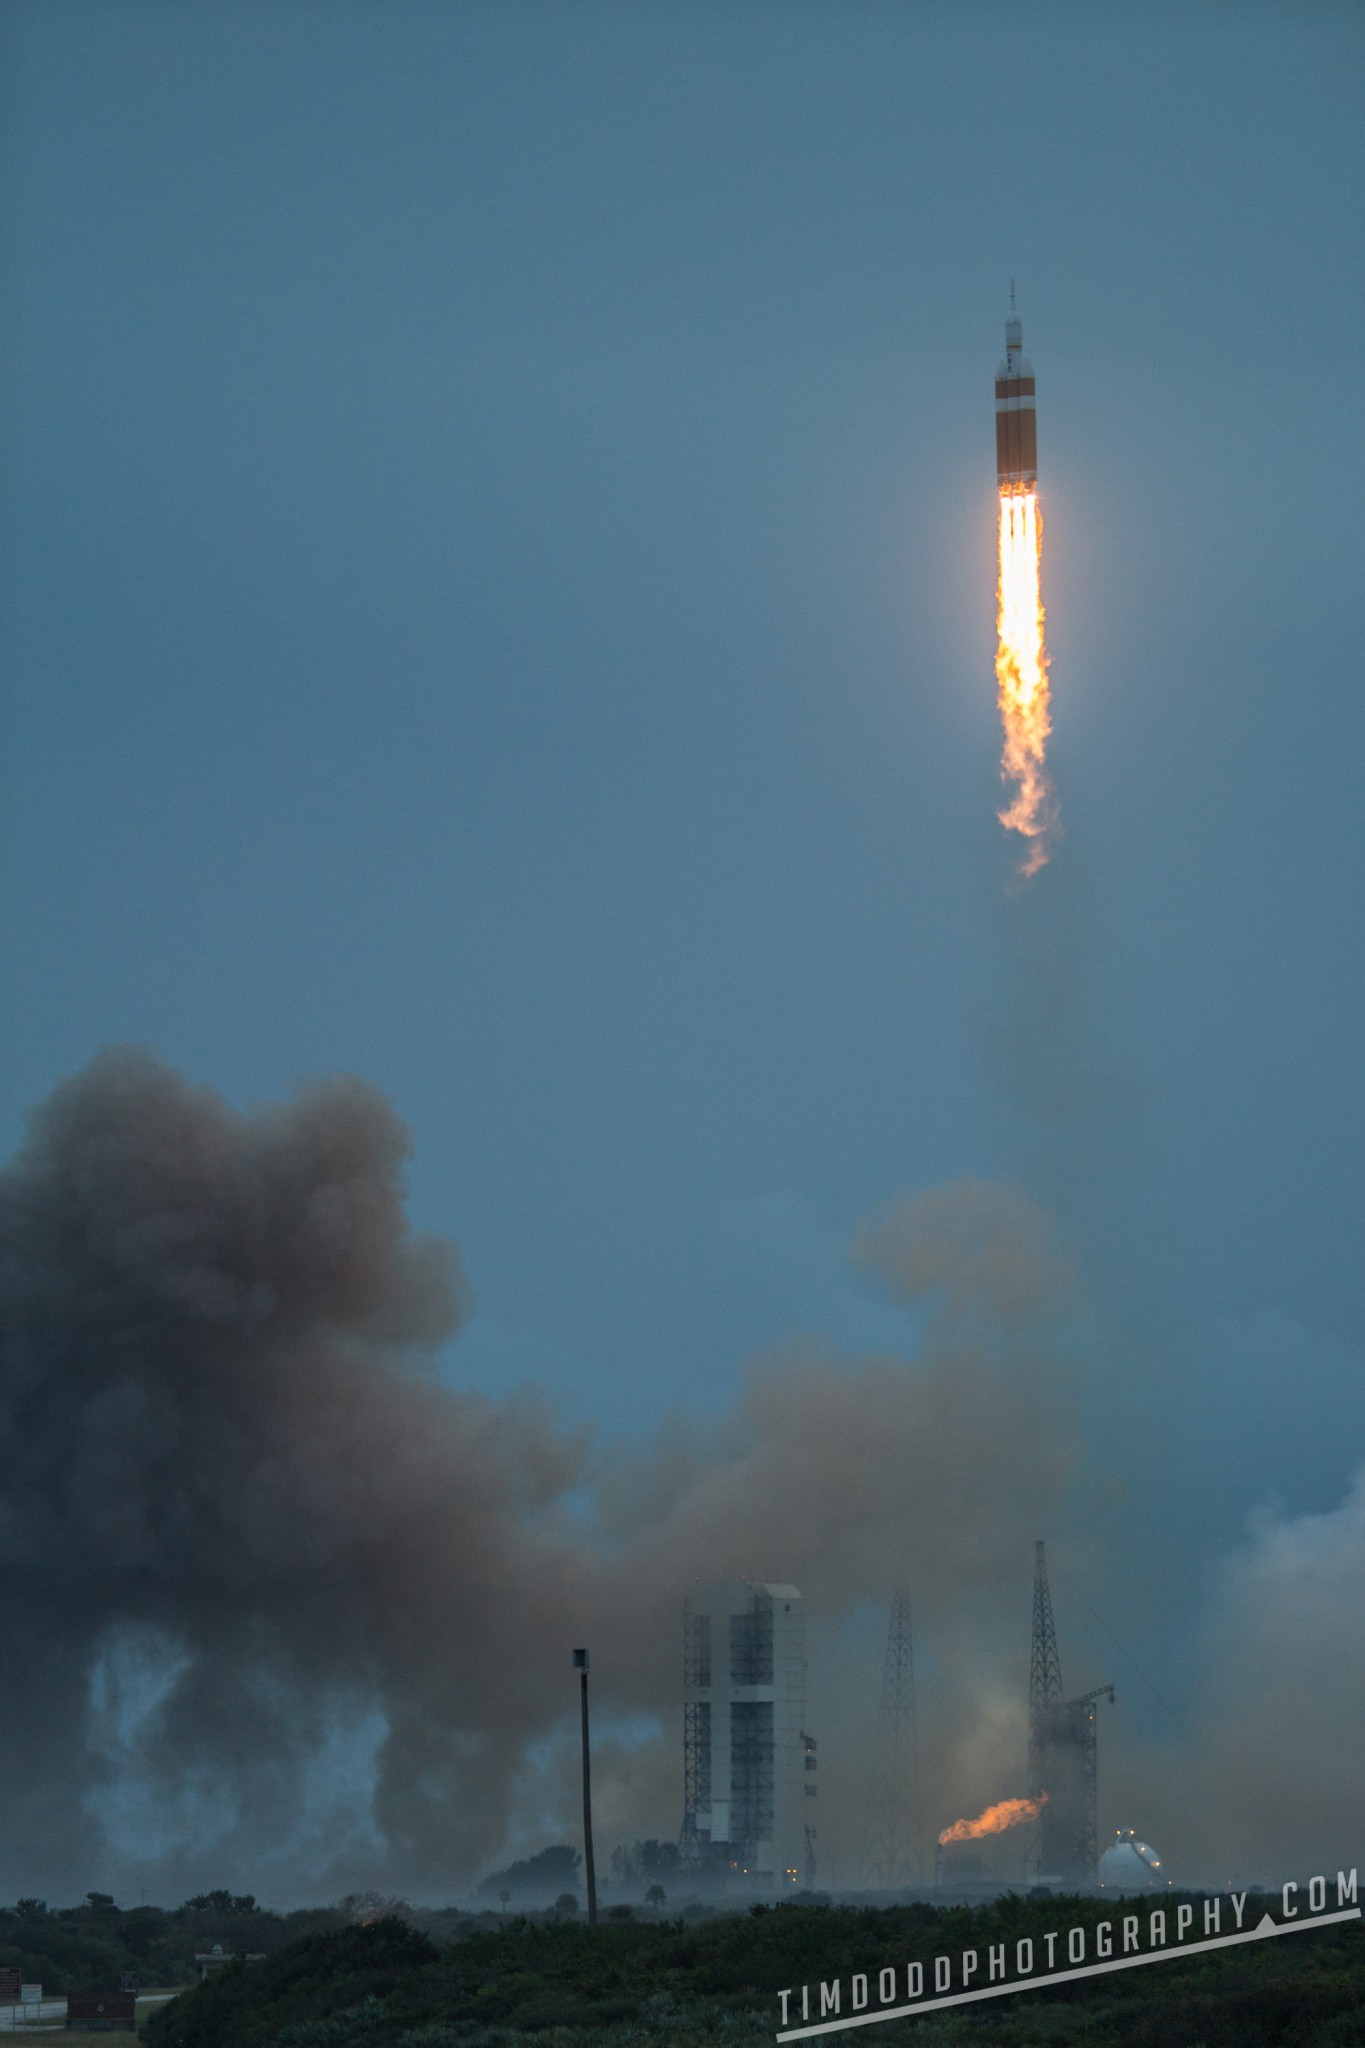
NASA’s Orion EFT-1 mission launched on a ULA Delta IV Heavy. Canon 5D MK III, 600mm @F5.6, 1/1000th second, ISO 200
This is what 600mm’s from 3 miles away looks like. This was taken with a Canon 5D MKIII with a Sigma 120-300mm F2.8 Sport lens with a Canon 2x teleconverter. Notice it doesn’t look terribly sharp. That’s not the fault of the camera, lens or even the operator. That’s from incredibly dense morning humidity that prevents images from looking crisp.
Same launch: Orion EFT-1 but this time from a Canon EOS M and a Canon 135mm F2.0L lens. 135mm @ F2.0, 1/400th second, ISO 200
This is what 135mm looks like on a crop camera from 3 miles away. Notice, I said “on a crop camera.” So this would be equivalent to just over 200mm’s on a full frame camera. It’s important you know what size of sensor you have in order to do a proper comparison.
Same launch again. This was actually the morning before the launch. But it gives you a good sense of how far away the launch pad looks at 3 miles. Canon 5D MKIII, Sigma 50mm F1.4 Art. F4.0, 1/30th, ISO 100
One quick note: Don’t stress too much about having a super low F-stop number for launch photography. The rockets put out a great amount of light, so even if your lowest F-stop is F8, you should still be able to let in enough light for decent photos. Another fun note is for rocket photography, having a crop camera is totally an advantage. It gives you an additional 1.5 or 1.6 times the telephoto. This is an obvious advantage when trying to get up close and personal on something far away.
So what if it’s a night time launch?
Night time launches can be extremely cool. They offer a unique opportunity to do a “streak” shot. A streak shot is where you drag the shutter open long enough to show the rocket’s movement through the sky.
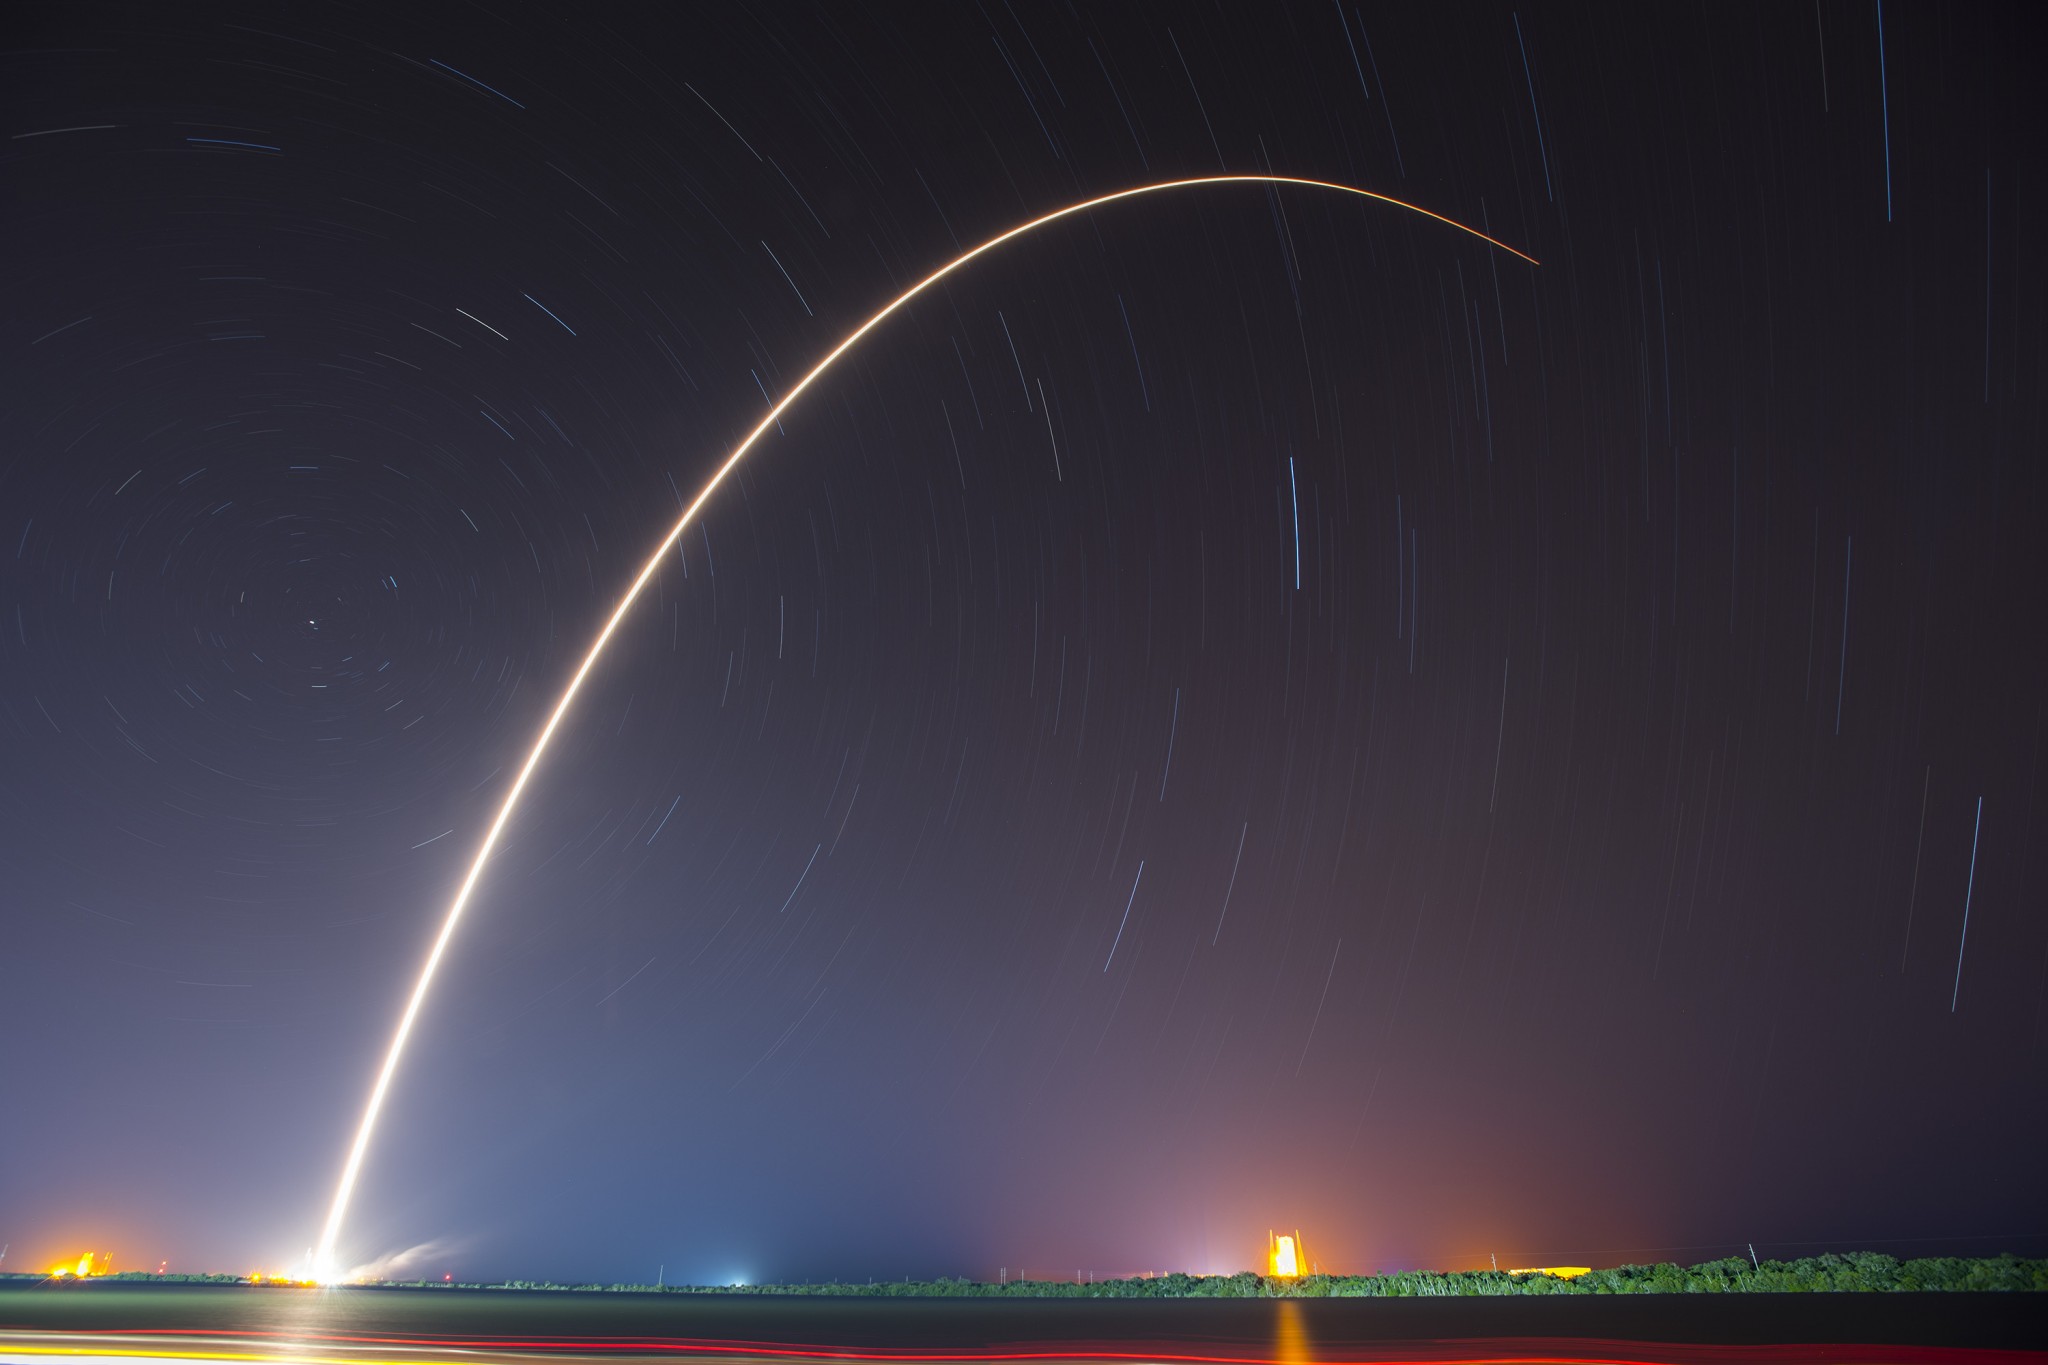
Photo credit VIA SpaceX. JCSAT-14 Launch May 6th, 2016
For streak shots, we’ll need to use a small aperture and a long shutter speed. You’ll want a simple remote trigger that will allow you to keep the shutter open using the “BULB” setting while not having to have your hands on the camera. Obviously if you’re hands on with the camera, your little movements will show up in the image, resulting in unwanted blur. Set your ISO to 100 so the image doesn’t get too bright having been exposed for several minutes.
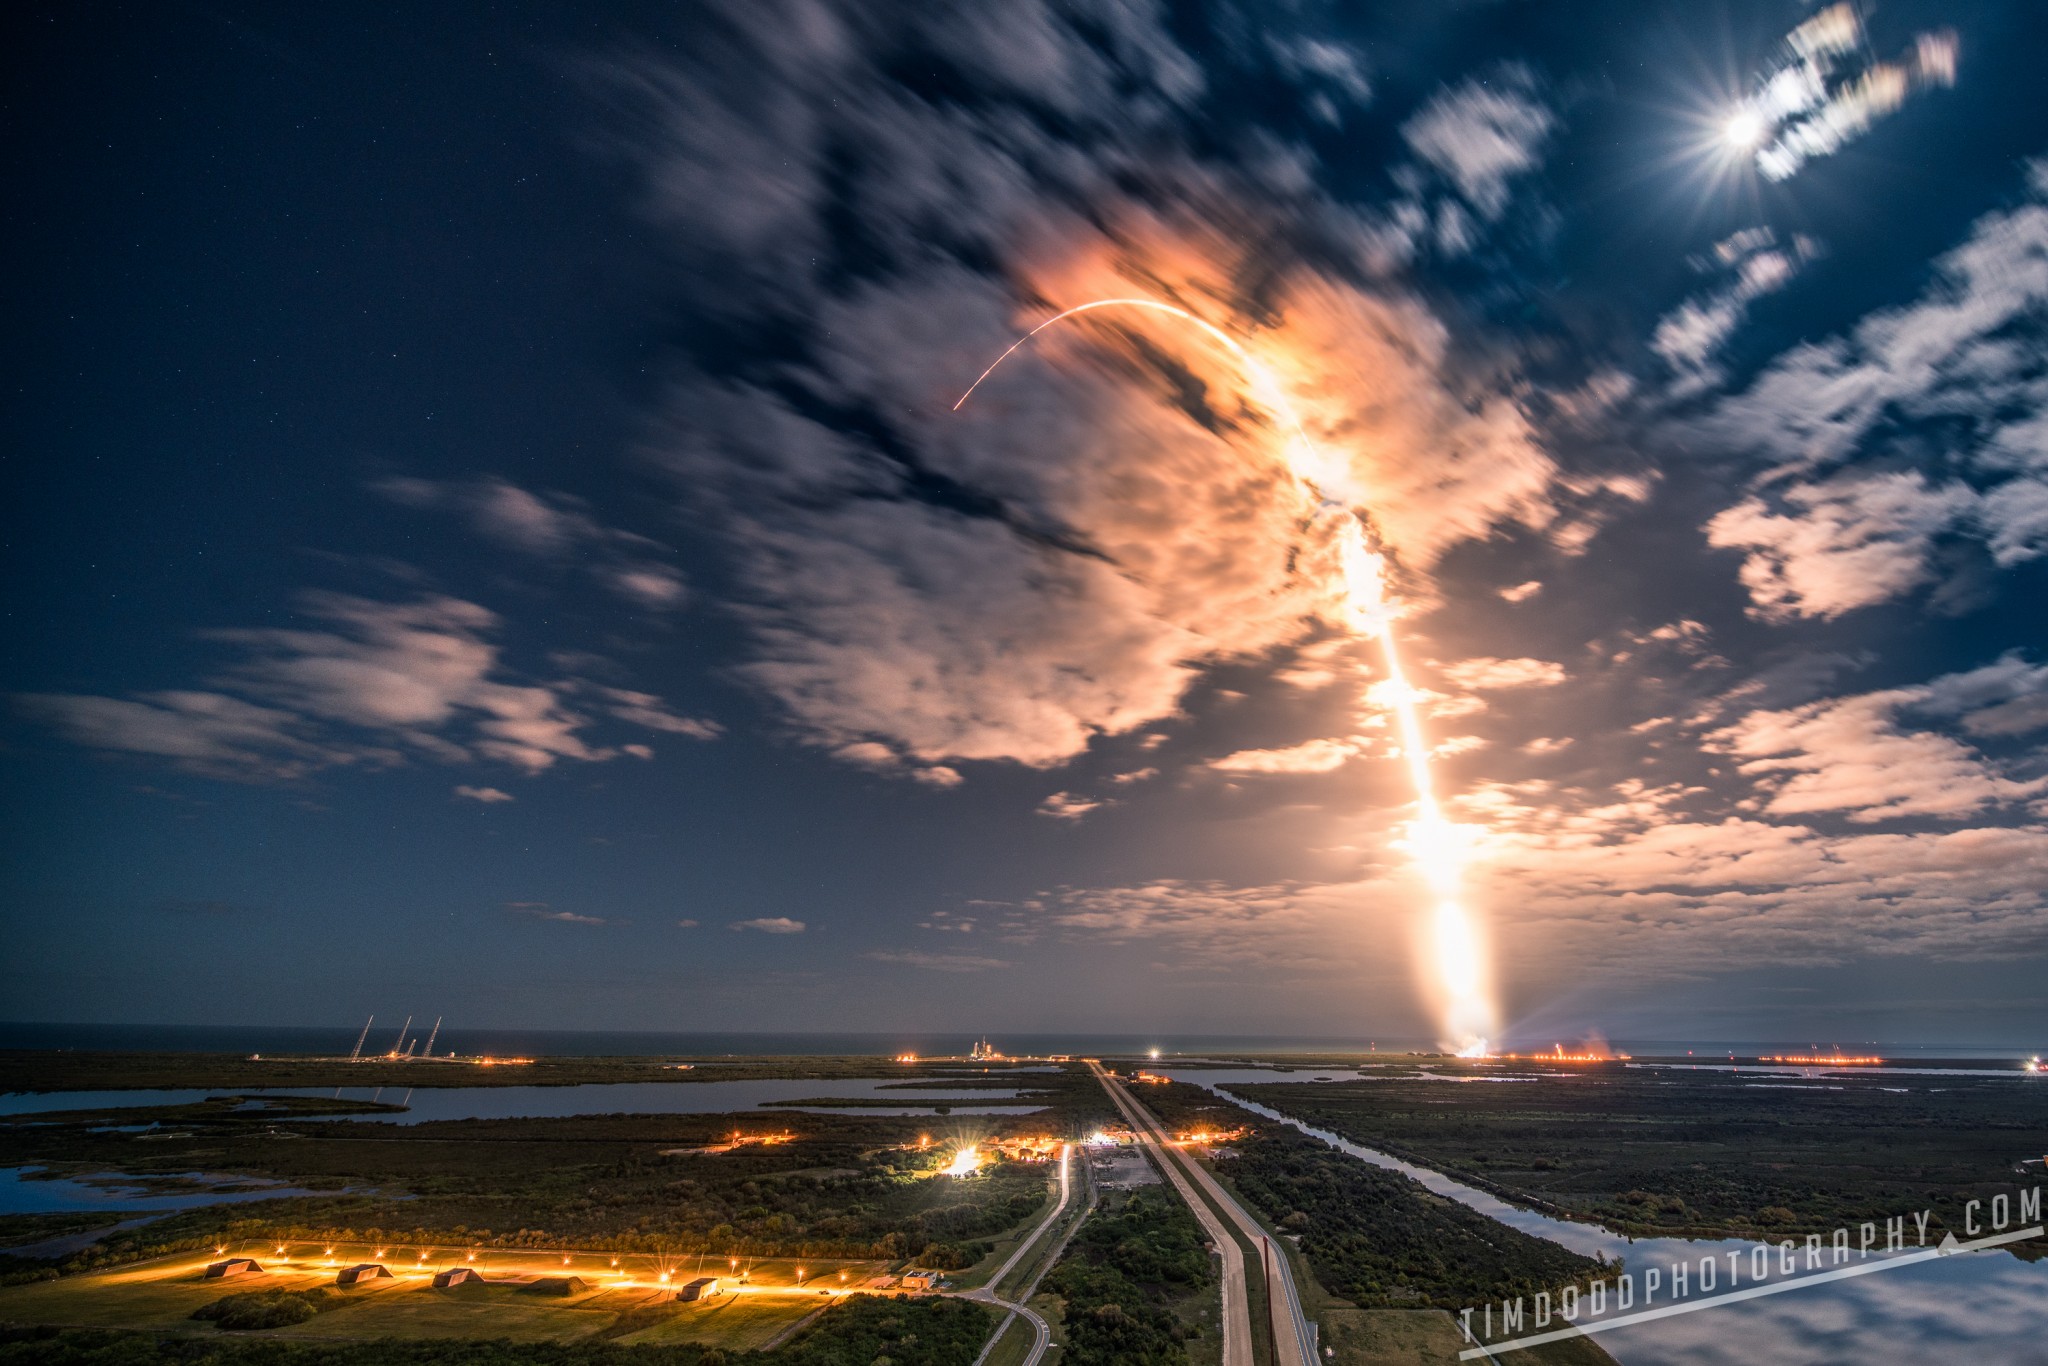
NASA’s OA-6 ISS resupply mission on an Atlas V rocket.
I have to admit I’ve only ever done one streak shot. This is it. It was taken from on top of NASA’s 535 foot tall VAB (Vehicle Assembly Building) at Kennedy Space Center. I did something a little different. Instead of holding the shutter open for 3 minutes and hoping you nailed the exposure, I opted to shoot 6 30 second exposures and then “stack” them in photoshop. This allows for more control over the exposure. I shot this with a Sony A7RII and a Canon 11mm – 24mm F4L.
That about does it for my experience shooting rockets thus far. Got questions? Leave it in the comments! As always, keep up to date with me on Instagram @EverydayAstronaut or for launch photos, gear, and random-ness follow me @timdoddphotography


Leave a reply